Exercise 4: SharePoint Framework tabs
- Presentation
- Exercise 1: Lab setup
- Exercise 2: SharePoint News
- Exercise 3: SharePoint List Tab
- Exercise 4: SharePoint Framework tabs (You are here)
- Exercise 5: Calling the Microsoft Graph
- Resources
In this exercise, you will build a map tab that can display trouble spots during an emergency. The tab is built as a SharePoint Framework web part, where SharePoint provides hosting, authentication, and a number of other services. As in Exercise 3, the data is stored in a SharePoint list, but this time the list is accessed using the Microsoft 365 Graph.
Before you begin
To complete all the steps in this exercise and the next you will need:
- A computer running a code editor such as Visual Studio Code
- A computer running Node.js version 10.x. to run the development toolchain. (SharePoint Framework only works with Node.js 10.x). You can check the node version with the command:
node -v
If this is impractical for some reason, the completed builds are provided as part of this repository. The instructions include details on how to install the pre-built packages.
While SharePoint Framework for SharePoint Online only supports Node.js version 10.x, you may find yourself wanting other versions for other projects. To facilitate switching Node versions on your computer, you may wish to install Node Version Manager (nvm) before installing Node.js. Then you can these commands to install and swap Node versions:
nvm install (version) # Install a Node version, such as 10.22.1)
nvm list              # List the installed versions
nvm use (version)     # Switch to the specified Node version
Once you’ve installed a supported version of Node, you’ll need the gulp task runner to build it. Install gulp with this command:
npm install gulp --global
🍎 Note: If you’re using MacOS and getting an error while trying to install gulp, you probably need to download and install XCode Command Line Tool first. Go to developer.apple.com/download/more/ and look for “Command Line Tools”.
If you just want to build this one project, skip to step 1. If you’d like the ability to create new SharePoint Framework projects in the future, you can follow these detailed instructions, or run just this additional Node command to install yeoman and the SharePoint yeoman genrator:
npm install yo @microsoft/generator-sharepoint --global
Step 1: Download and build the project
a. Clone or download the bootcamp repository by returning to the project page and selecting the Code button.
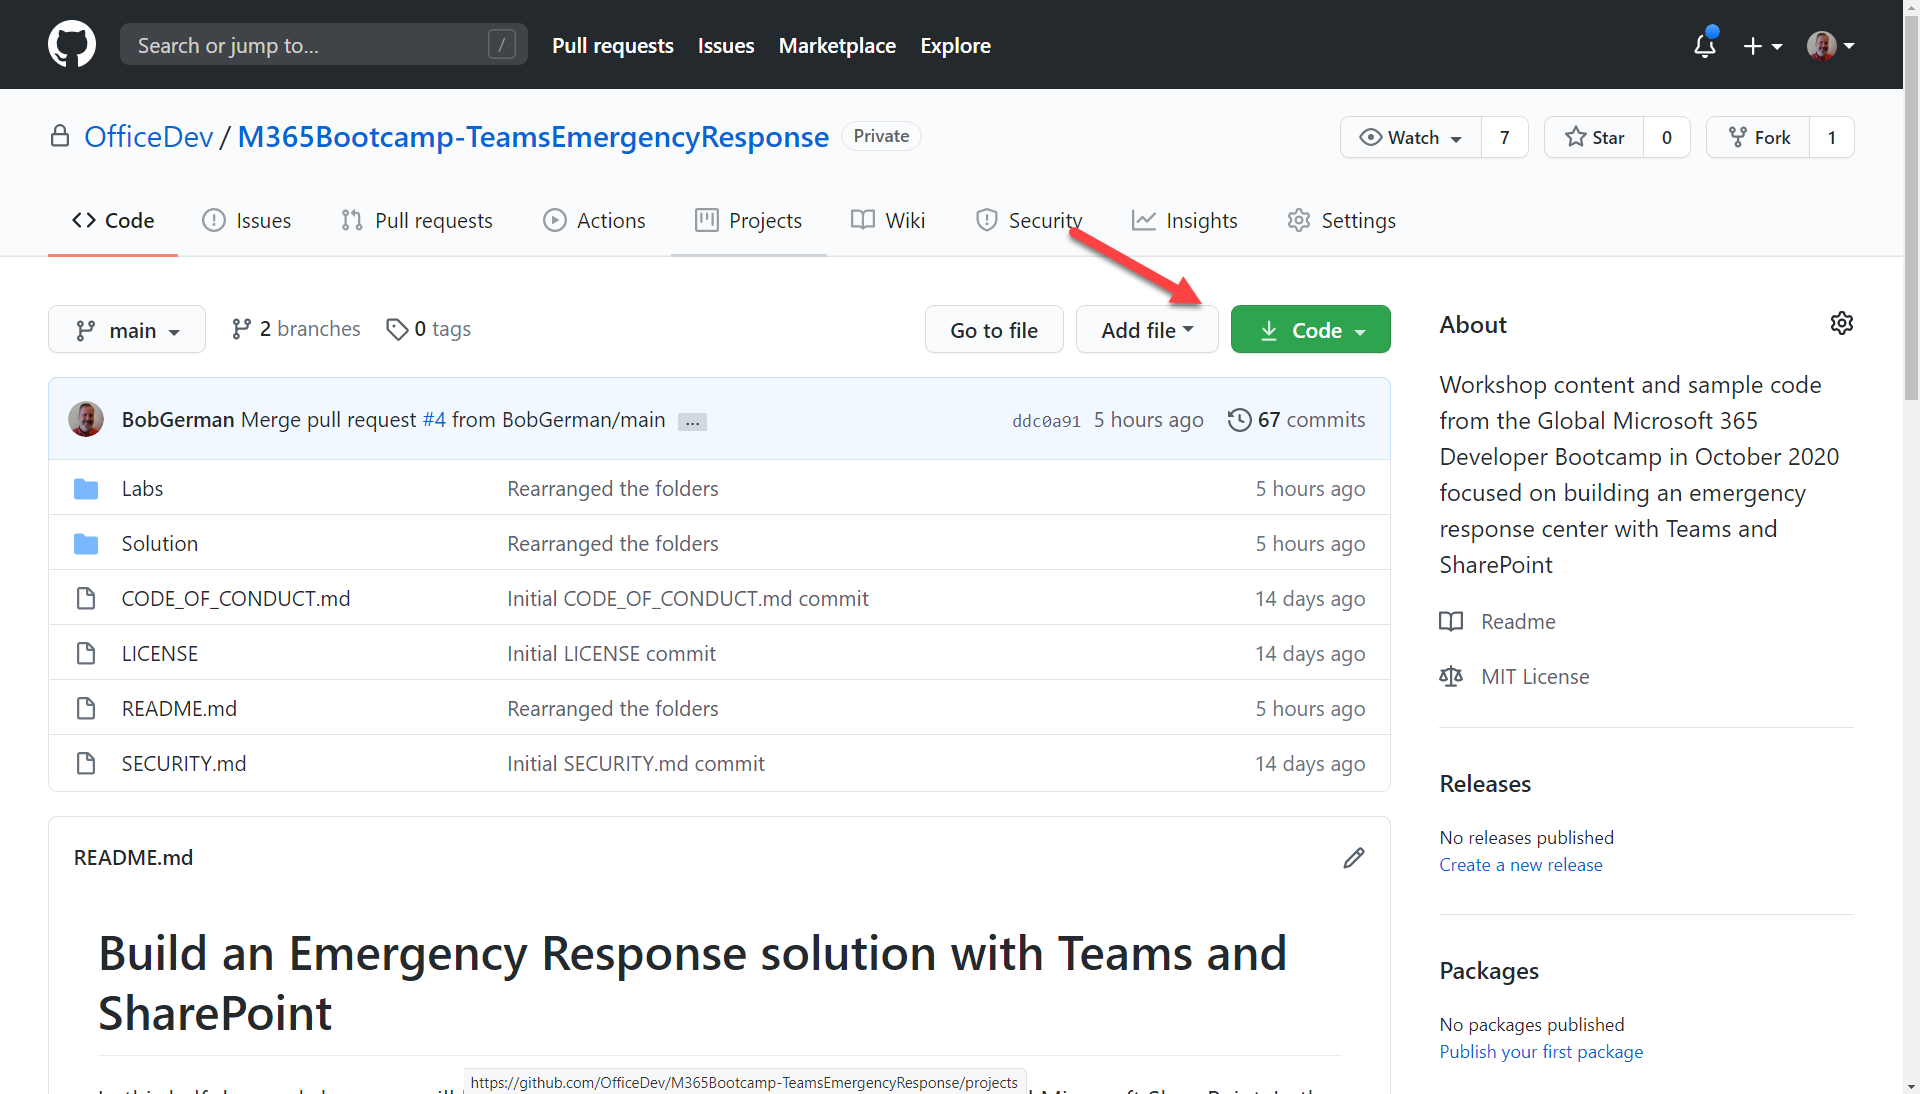
b. To view the source code, open the project folder (Solution/MapViewer) in your code editor. If you don’t have a code editor, you can view it in the browser here. You don’t need to change the code, however, until the next exercise.
c. If you don’t have developer tools installed, you can find the finished solution package in the Solution/MapViewerPackages/Exercise 4 folder. Download the map-viewer.sppkg file and skip to Step 2.
If you do have developer tools installed, open a terminal (command line) and and browse to the MapViewer folder; you should be in the same folder with the package.json file.
Install the needed Node.js packages using this command:
npm install
⛏️ If you’re working on macOS, and haven’t worked with SharePoint Framework before, there is a chance that you will be prompted to install Xcode command line tools or you will see an error stating that Xcode command line tools are not installed. To setup Xcode command line tools on your machine, follow the steps outlined at https://medium.com/flawless-app-stories/gyp-no-xcode-or-clt-version-detected-macos-catalina-anansewaa-38b536389e8d. If downloading Xcode command tools using the update manager fails, you can download them directly from https://developer.apple.com/download/more/?&name=for%20Xcode.
OPTION 1: If you want to run from a local web server so you don’t have to upload your changes each time you make a change, run these commands:
gulp trust-dev-cert
gulp bundle
gulp package-solution
gulp serve --nobrowser
The gulp trust-dev-cert command only needs to be run the first time you do this; it installs an SSL certificate for local debugging.
The gulp serve command starts a local web server at https://localhost:4321; and the SharePoint package points to that URL instead of a CDN so be sure to leave it running.
NOTE: If you get an error running these commands, please check to be sure you’re using Node version 10 as mentioned in Exercise 1. You can type
node -vto determine what version you are using.
OPTION 2: If you want to upload your JavaScript bundle to the SharePoint public CDN so it will work away from your development computer, run these commands:
gulp bundle --ship
gulp package-solution --ship
In either case, your bundle can be found in the MapVewer/sharepoint/solution folder with the name map-viewer.sppkg.
Step 2: Upload the SharePoint solution package to the SharePoint App Catalog
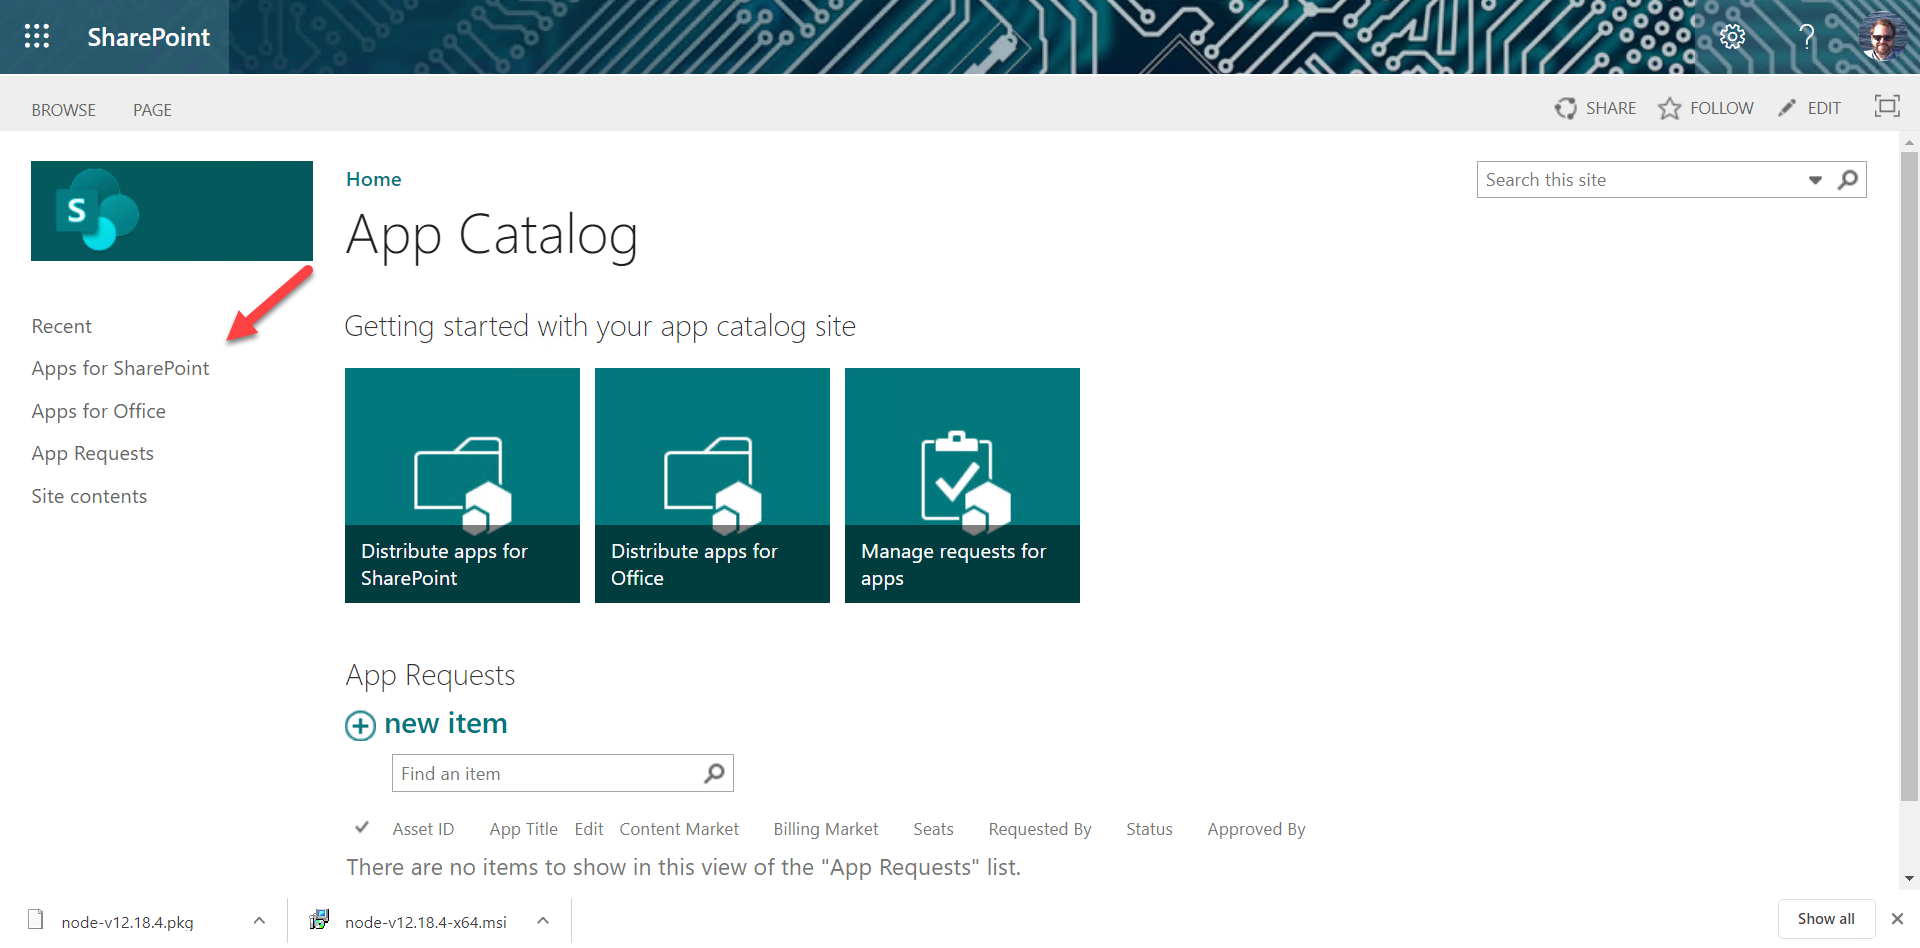
a. Return to the SharePoint app catalog. You can review Exercise 1 Step 3 if you need a reminder on how to get there.
Within the App Catalog, navigate to “Apps for SharePoint”.
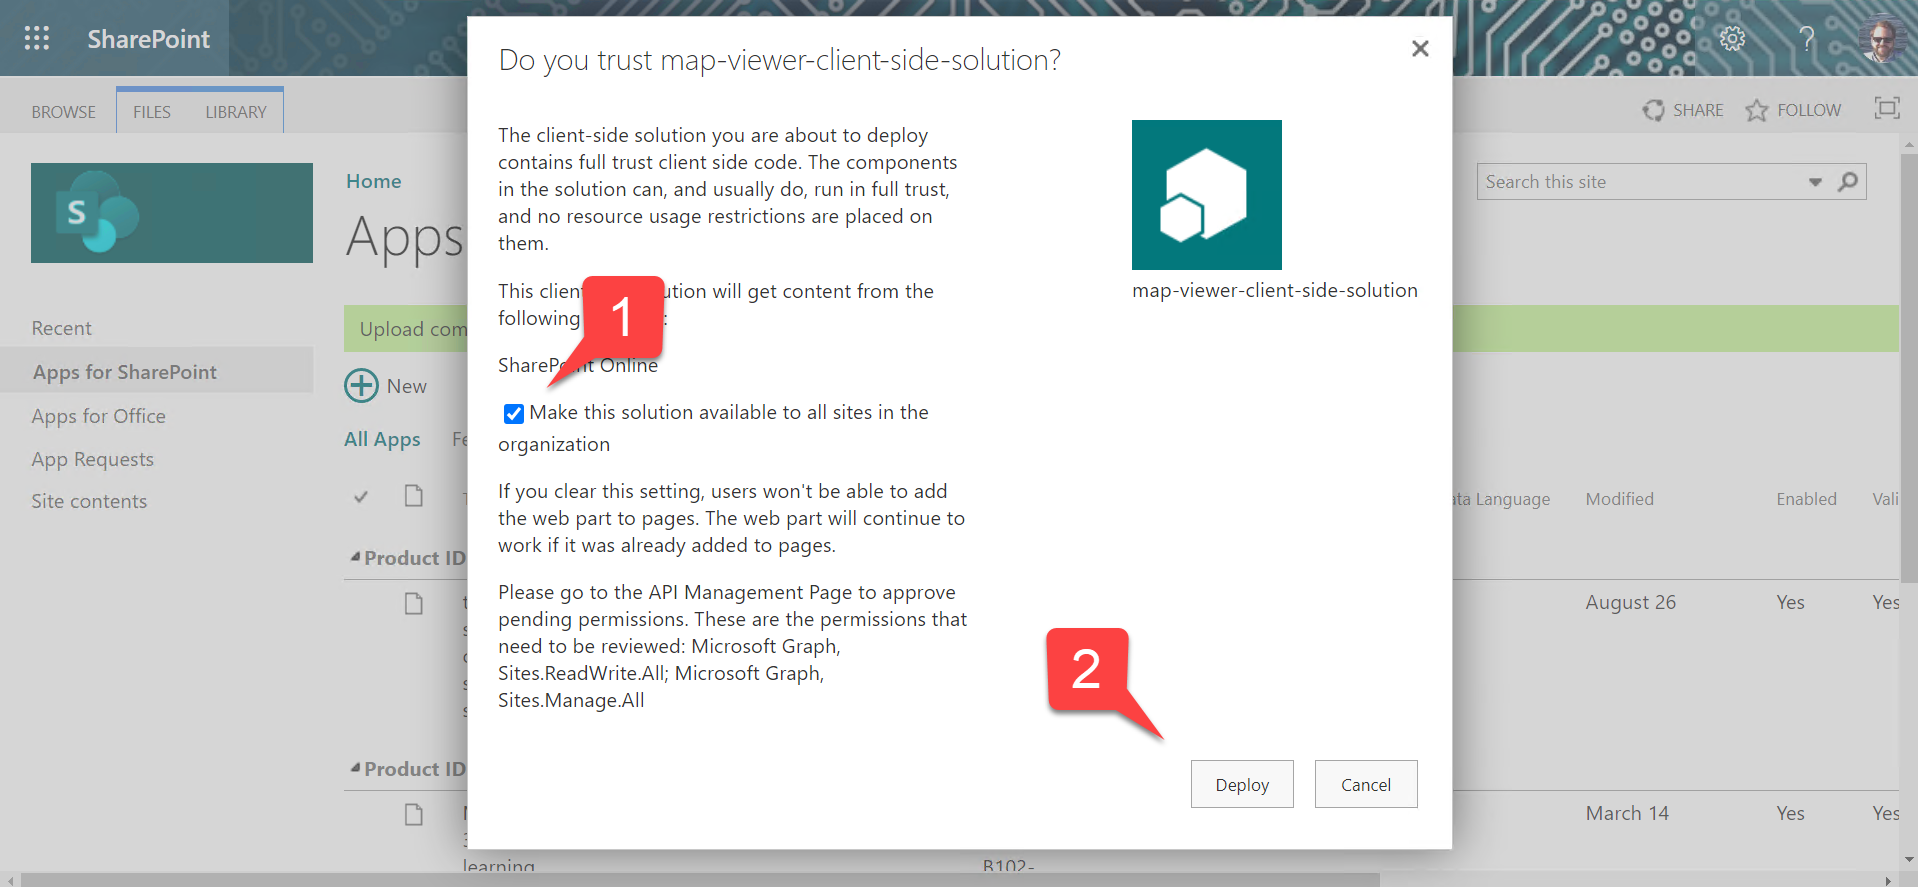
b. Upload the SharePoint solution package (.sppkg file) from Step 1. A dialog box will open up. Ensure that the Make this solution available in all sites checkbox 1️⃣ is checked, and then select the Deploy button 2️⃣. This allows it to be used in any Team’s associated SharePoint site.
c. Find the map-viewer solution and scroll all the way to the right. Ensure there were no errors.
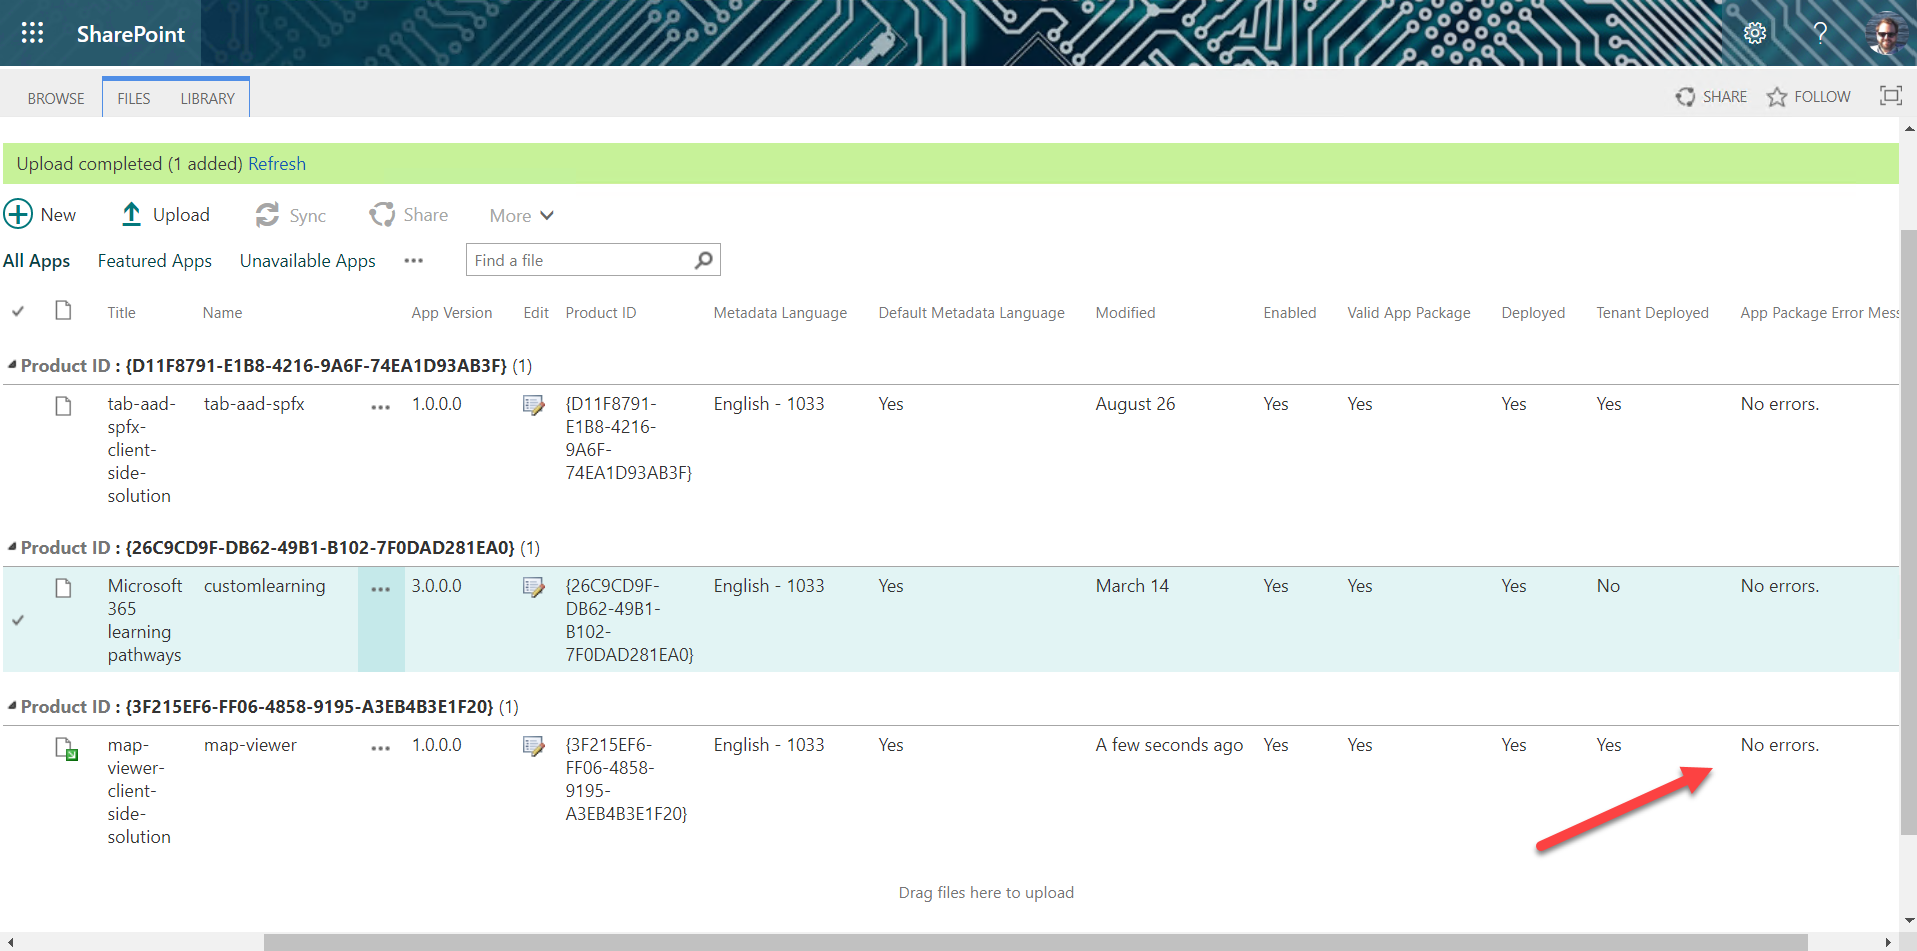
NOTE: If you encounter errors, it may be because your SharePoint app catalog hasn’t finished installing itself. It can take up to 30 minutes.
Step 3: Approve permissions
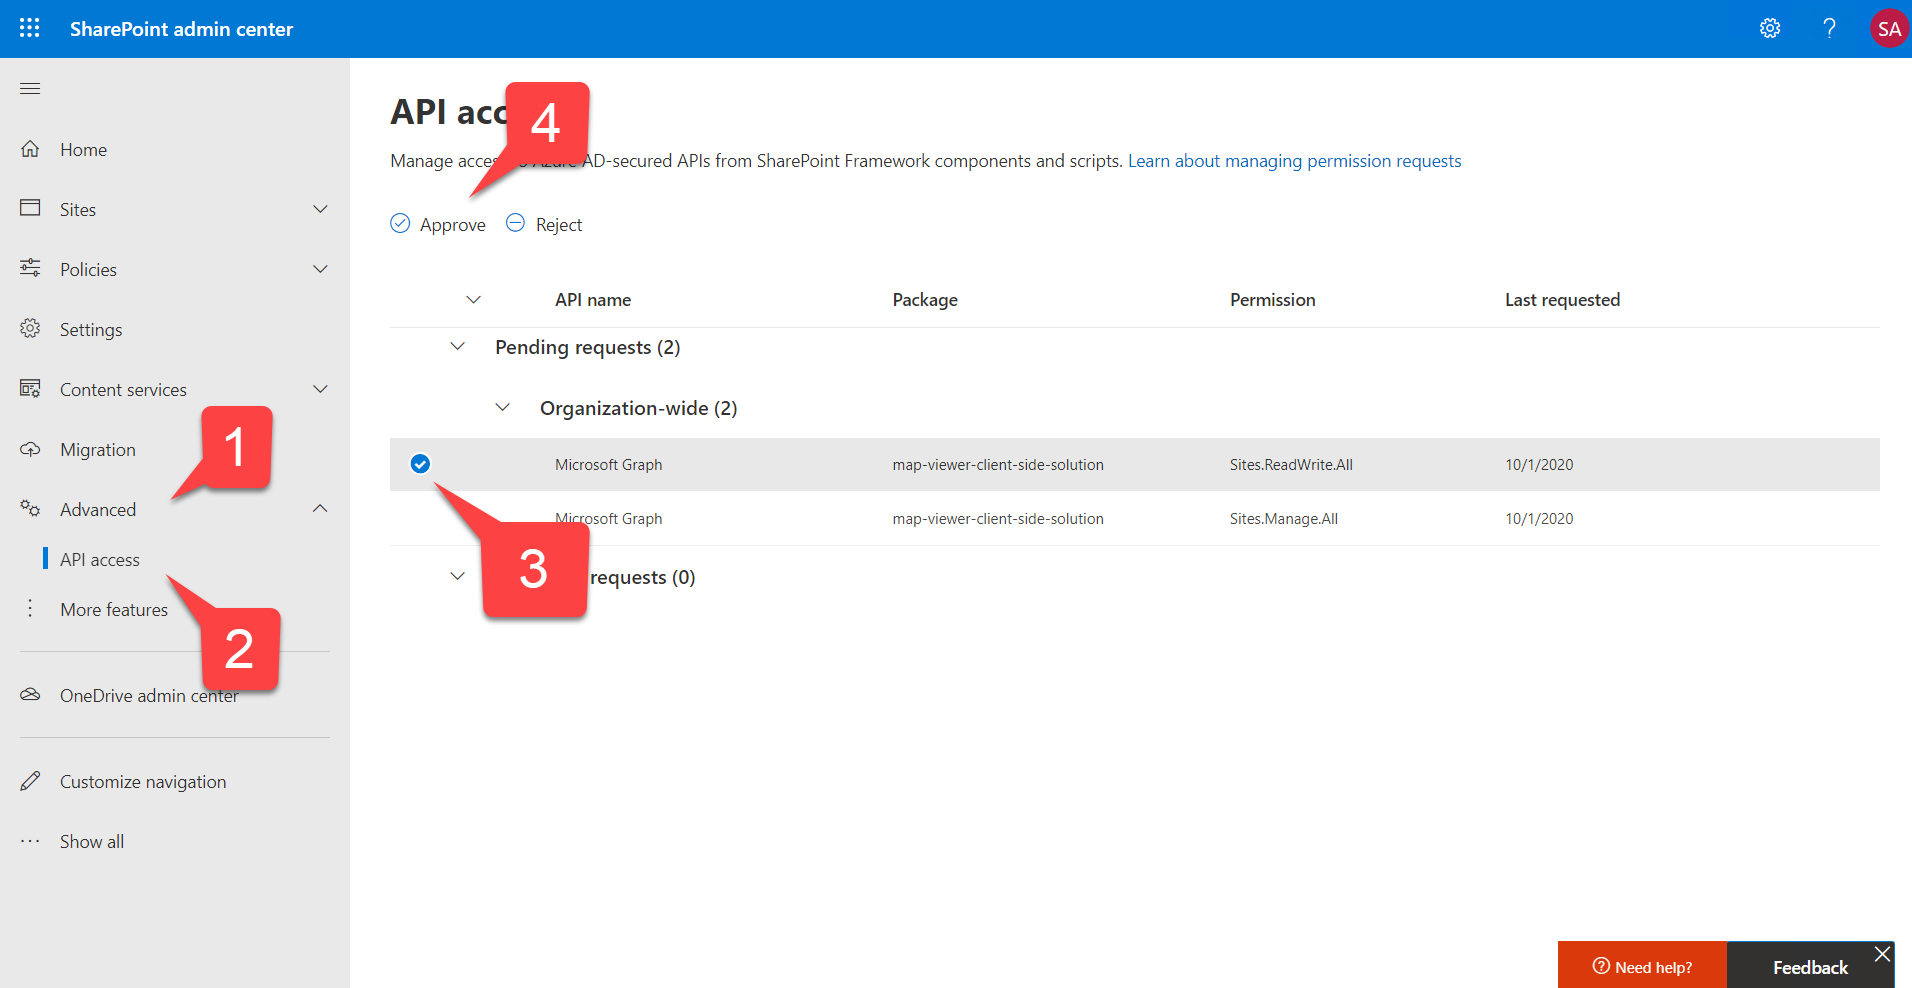
a. Return to the SharePoint administration page (should still be open in a browser tab), open the Advanced accordion 1️⃣, and select API access 2️⃣. In a moment you should see new permissions being requested; these permissions are the ones required for the Microsoft Graph calls used to provision, read, and write a list in SharePoint.
NOTE: It may take a couple minutes for your application to appear on the API Access screen.
Select one of the permission requests 3️⃣ and then select the Approve button 4️⃣. Repeat this with the other permission request.
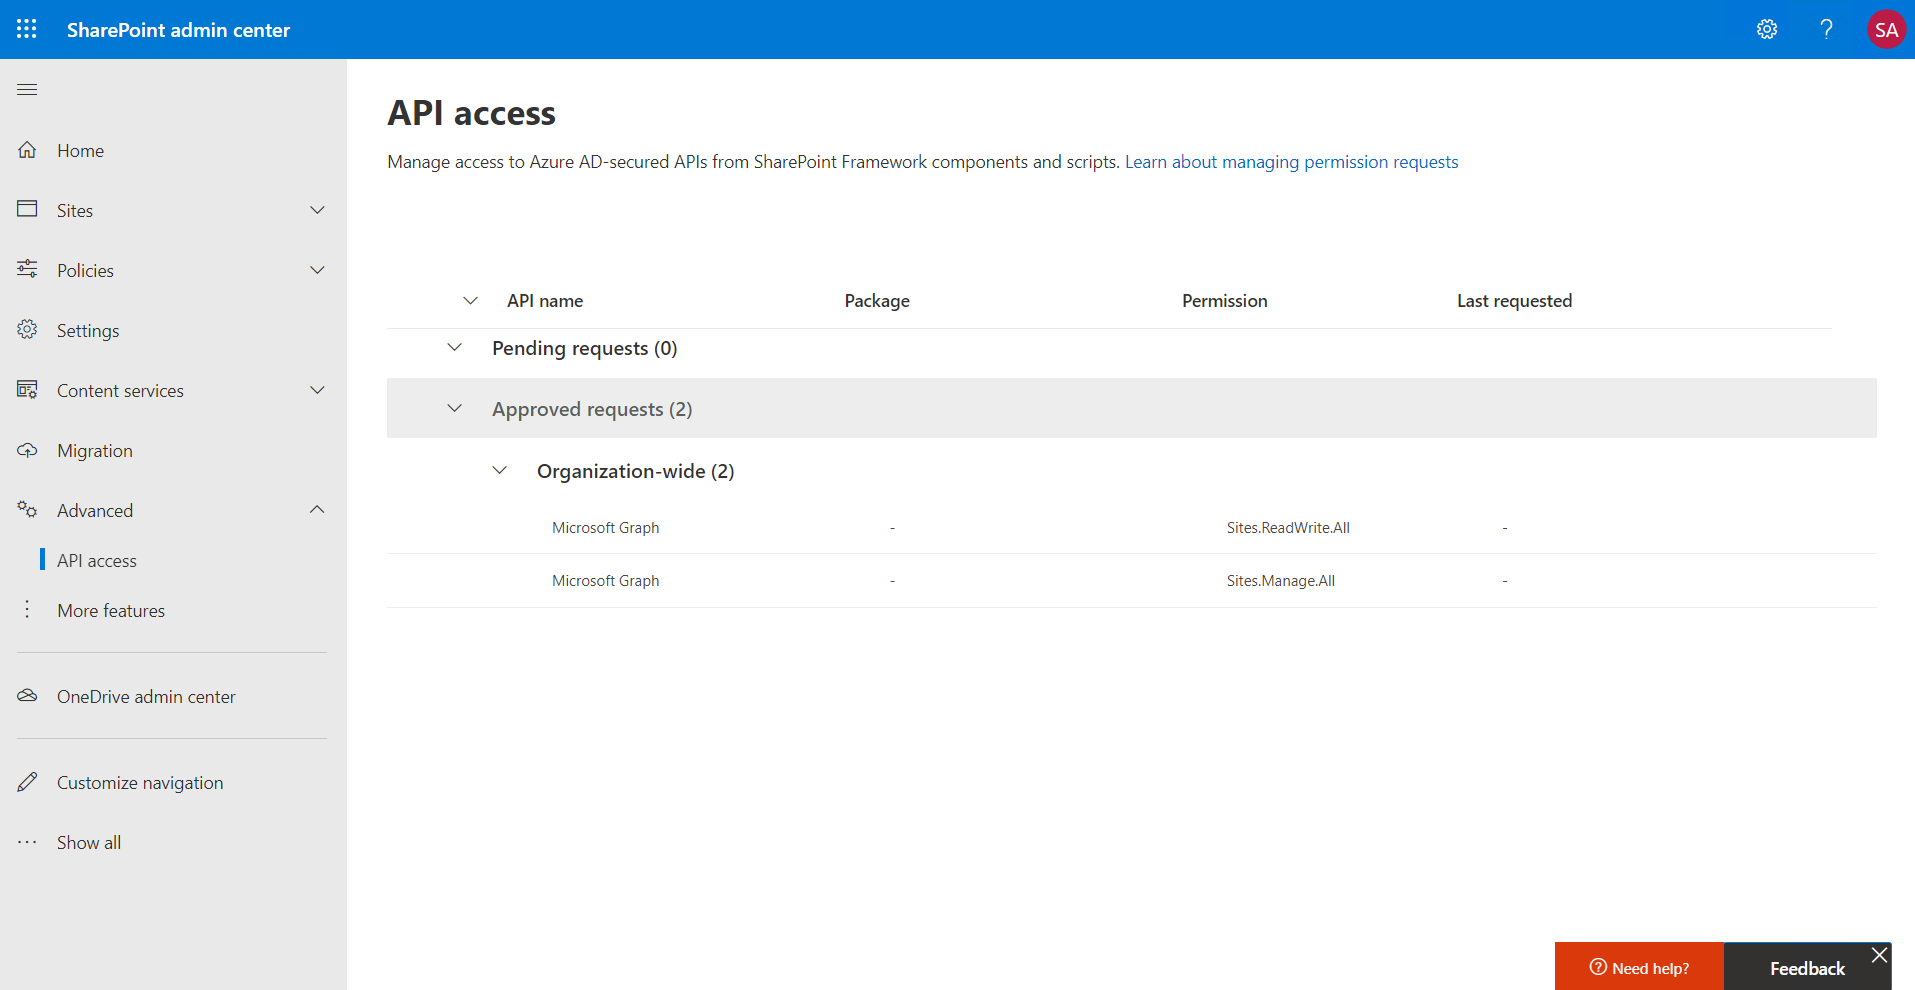
b. Ensure the permissions have been approved as shown.
Step 4: Install the app in the Emergency Response Team
😎 NOTE: The Teams package provided contains tokens such as {teamSiteDomain} and {teamSitePath} that are specific to SharePoint Framework. These allow your app to run in the SharePoint site associated with each Team. Check out manifest.json to see. This sort of app can be installed into Teams but it’s not possible to import it into App Studio or the Teams Toolkit for Visual Studio, since they don’t understand the SharePoint Framework tokens.
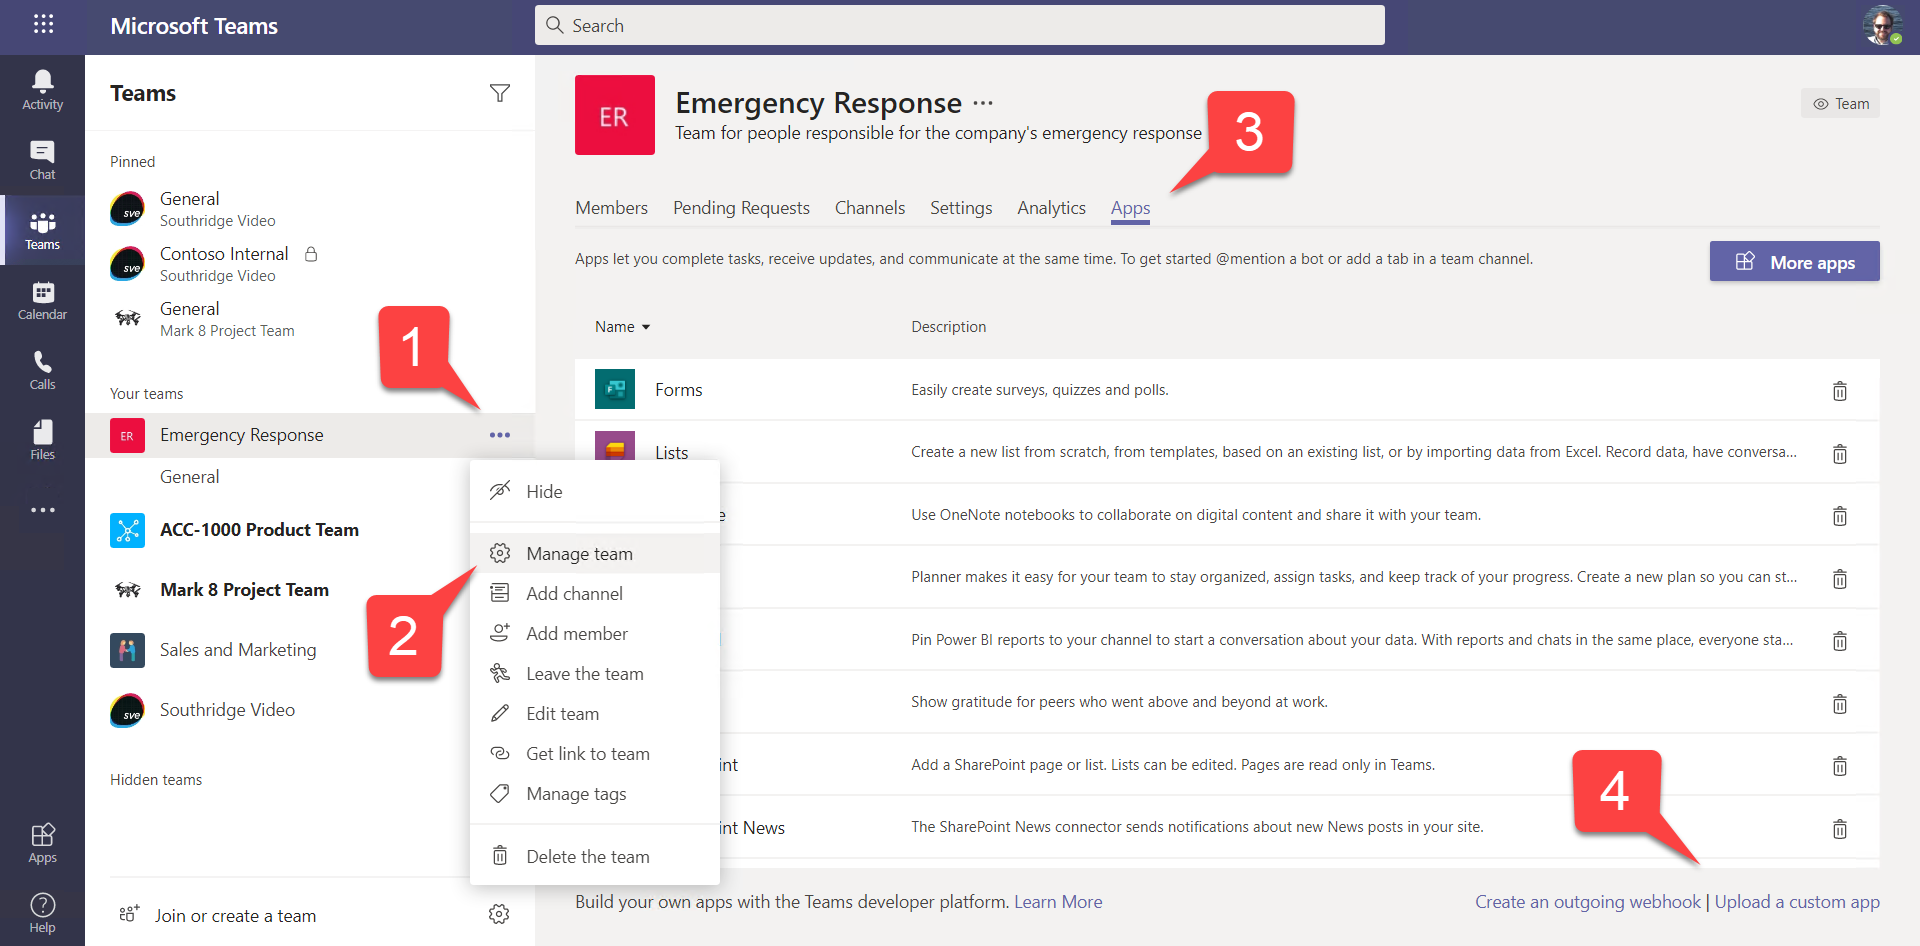
a. Return to Microsoft Teams. Using the ellipsis to the right of your Emergency Response Team name (not the channel) 1️⃣, select Manage Team from the menu 2️⃣. Select the Apps tab 3️⃣.
In the lower right corner of the screen, select Upload a custom app 4️⃣. Navigate to your local copy of this repository; in the Solution/MapViewer/Teams folder, you will find a Teams solution package MapViewer.zip. This is the file you need to upload.
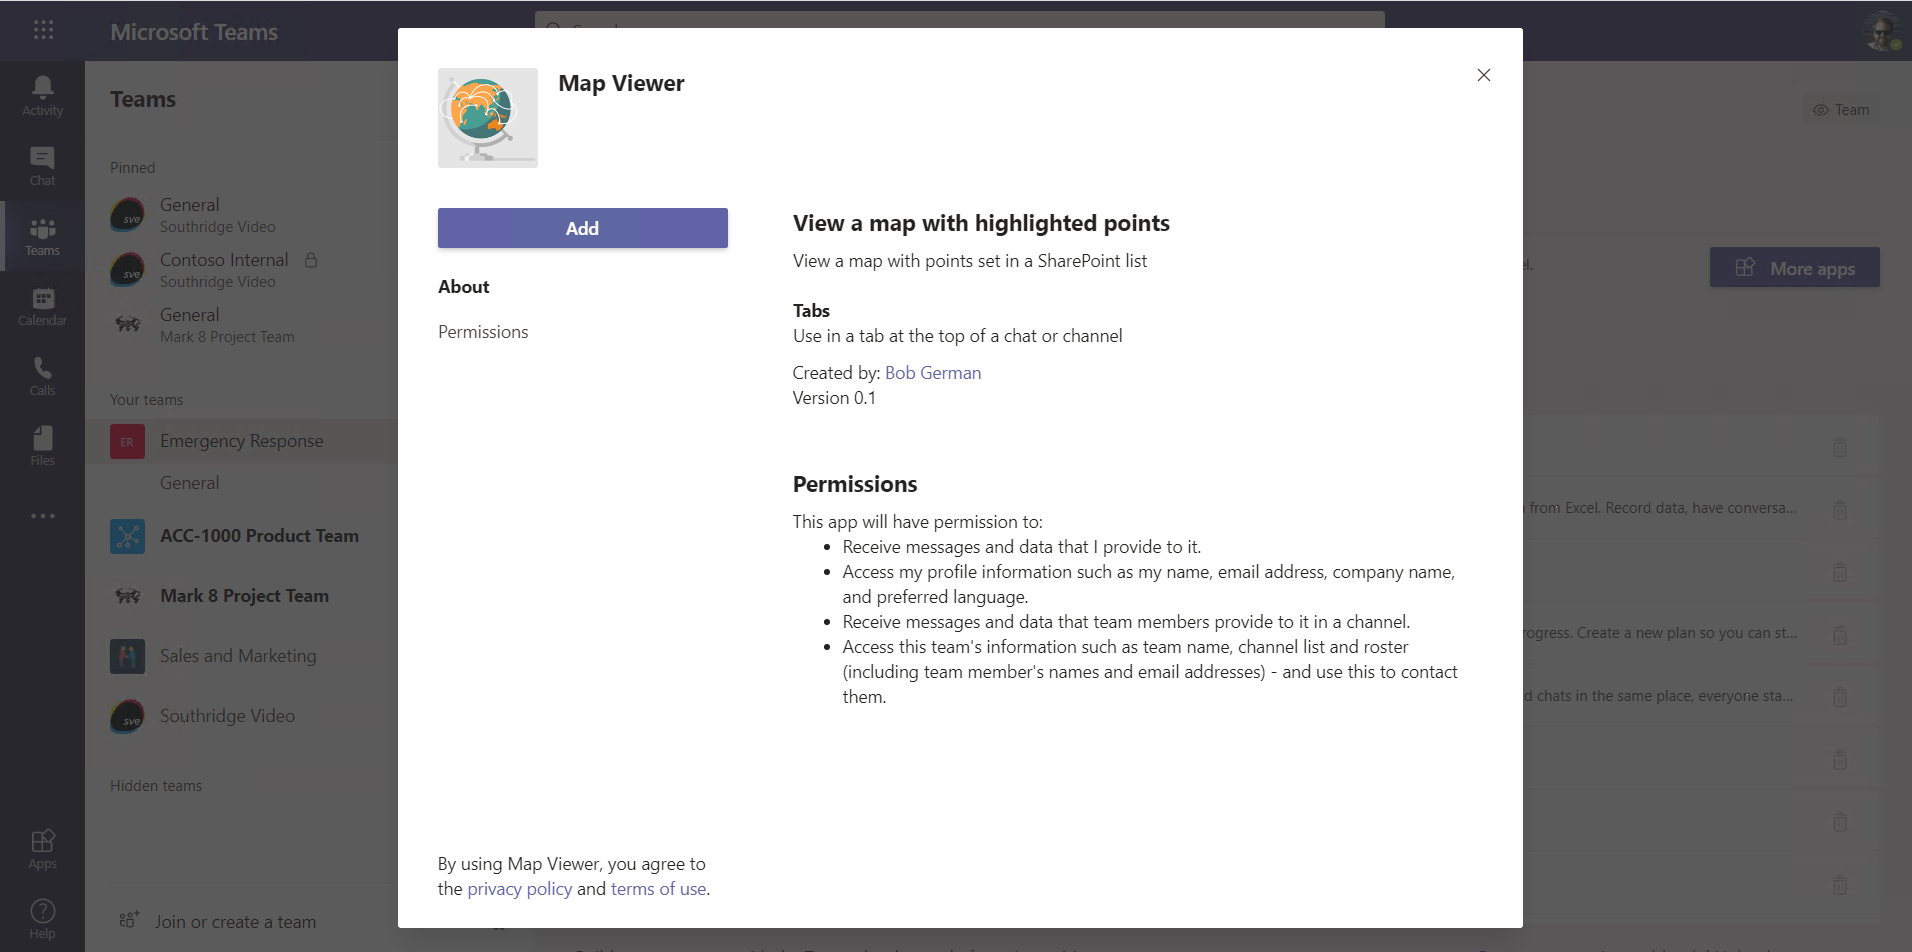
b. The app summary page will come up; just select Add.
c. Now return to the General channel and use the + to the right of the other tabs to add a new one. Select the Mapviewer application. The tab configuration page will come up; select Save.
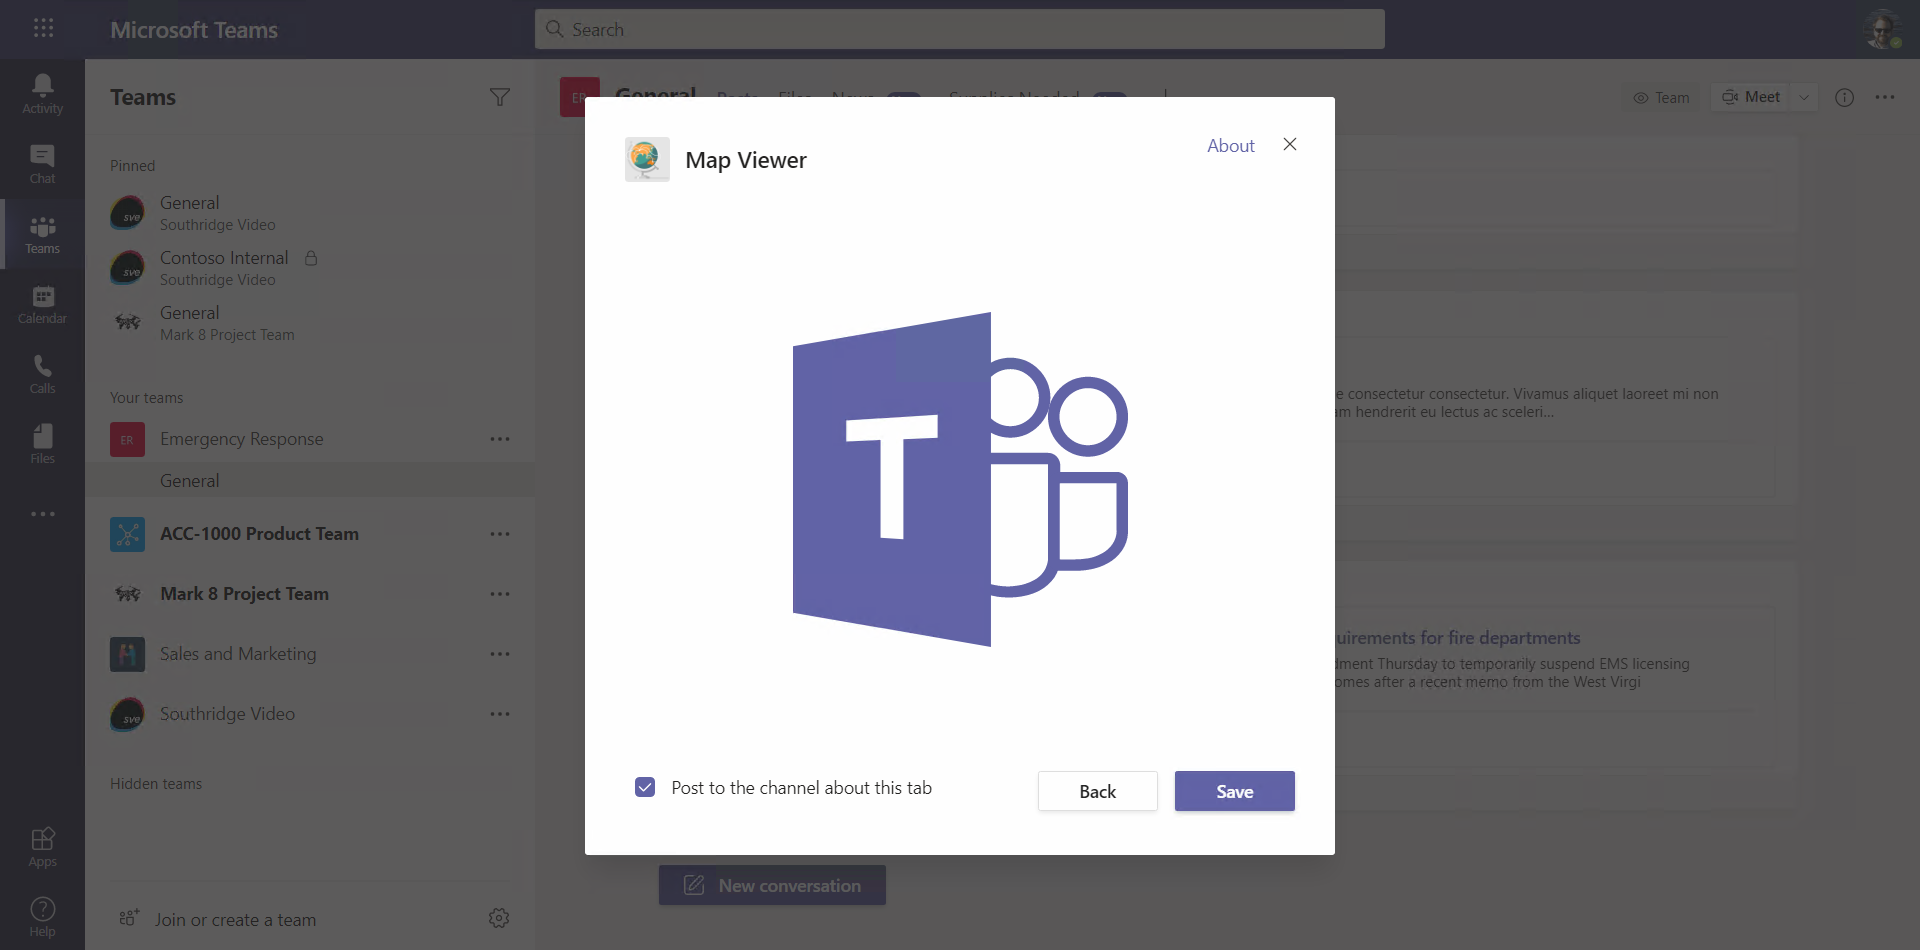
? ⛏️ WHY AN EMPTY PAGE WITH A BIG TEAMS LOGO? In Teams channels and group conversations, tabs are configurable. This means the app provides a configuration page where the user can decide what the tab should show. In this case, SharePoint didn’t need any additional information, so they just showed the Teams logo. This allows your SharePoint Framework web part to use the standard web part editing experience, which you’ll see in just a moment.
d. The tab will open but initially the map won’t work because it requires a Bing Maps key. You can get a free Bing Maps key at the Bing Maps Get Started page or follow the detailed instructions here. If you are taking a live workshop, your instructor may be able to provide you with a temporary Bing Maps key.
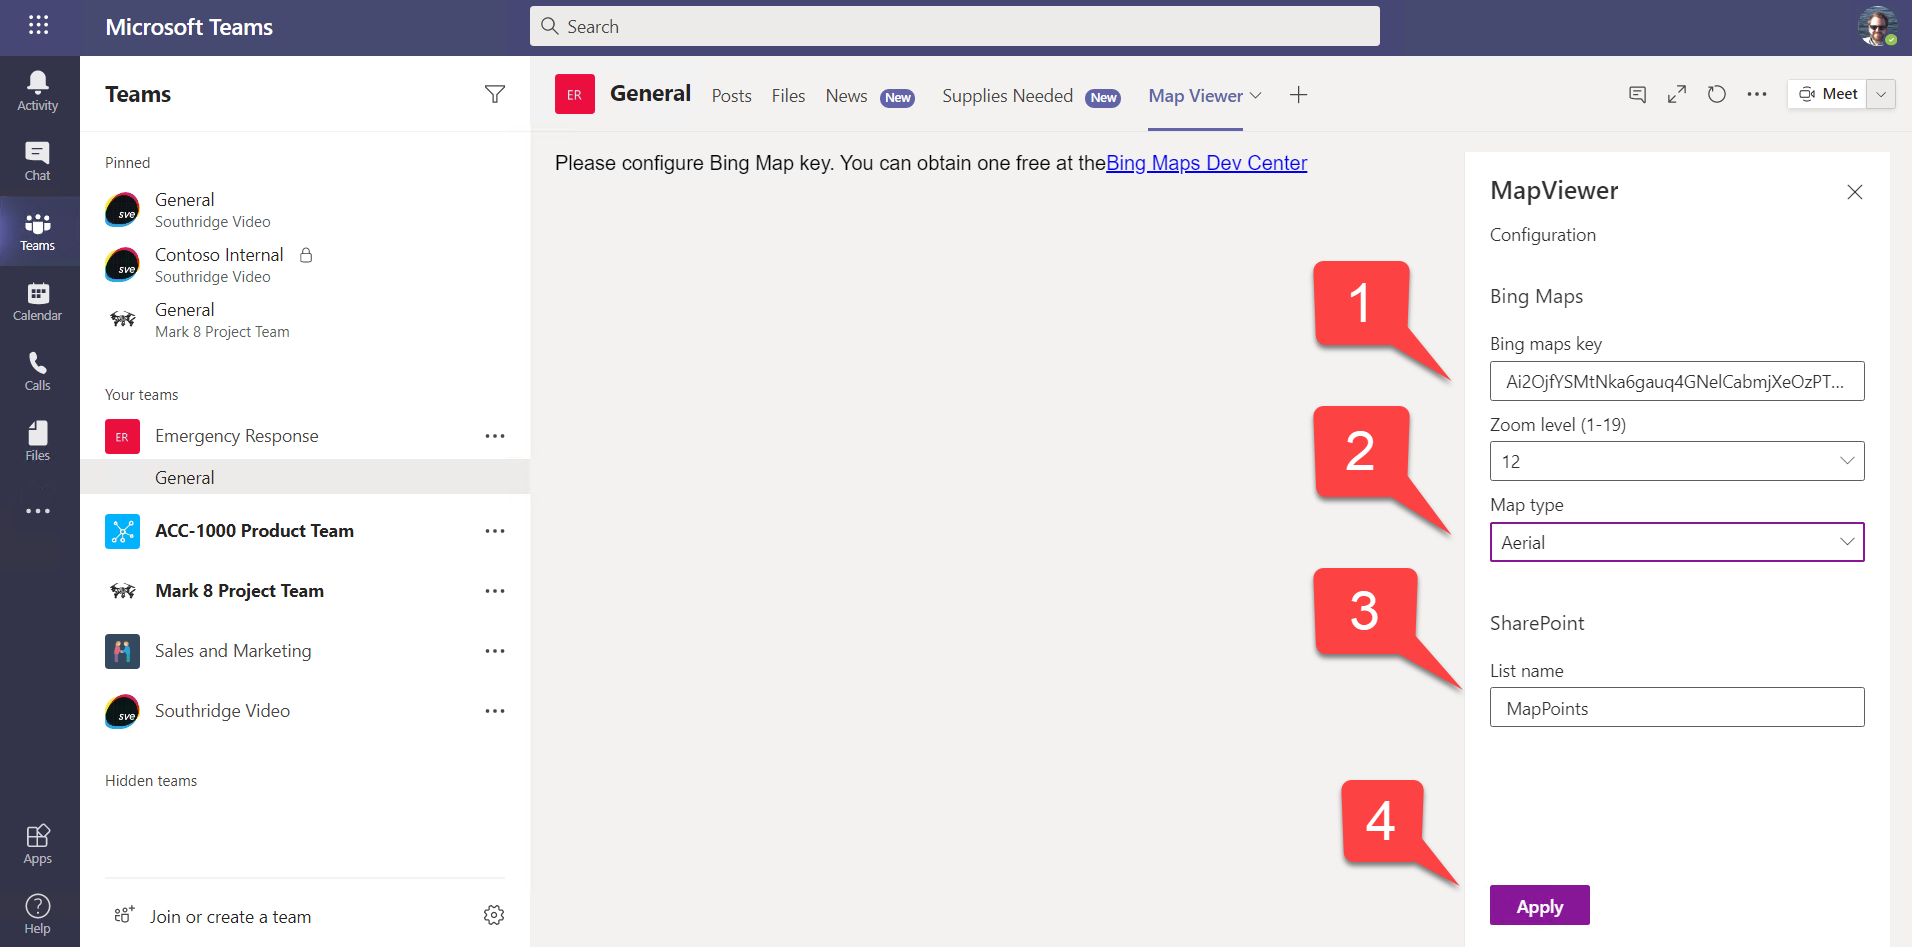
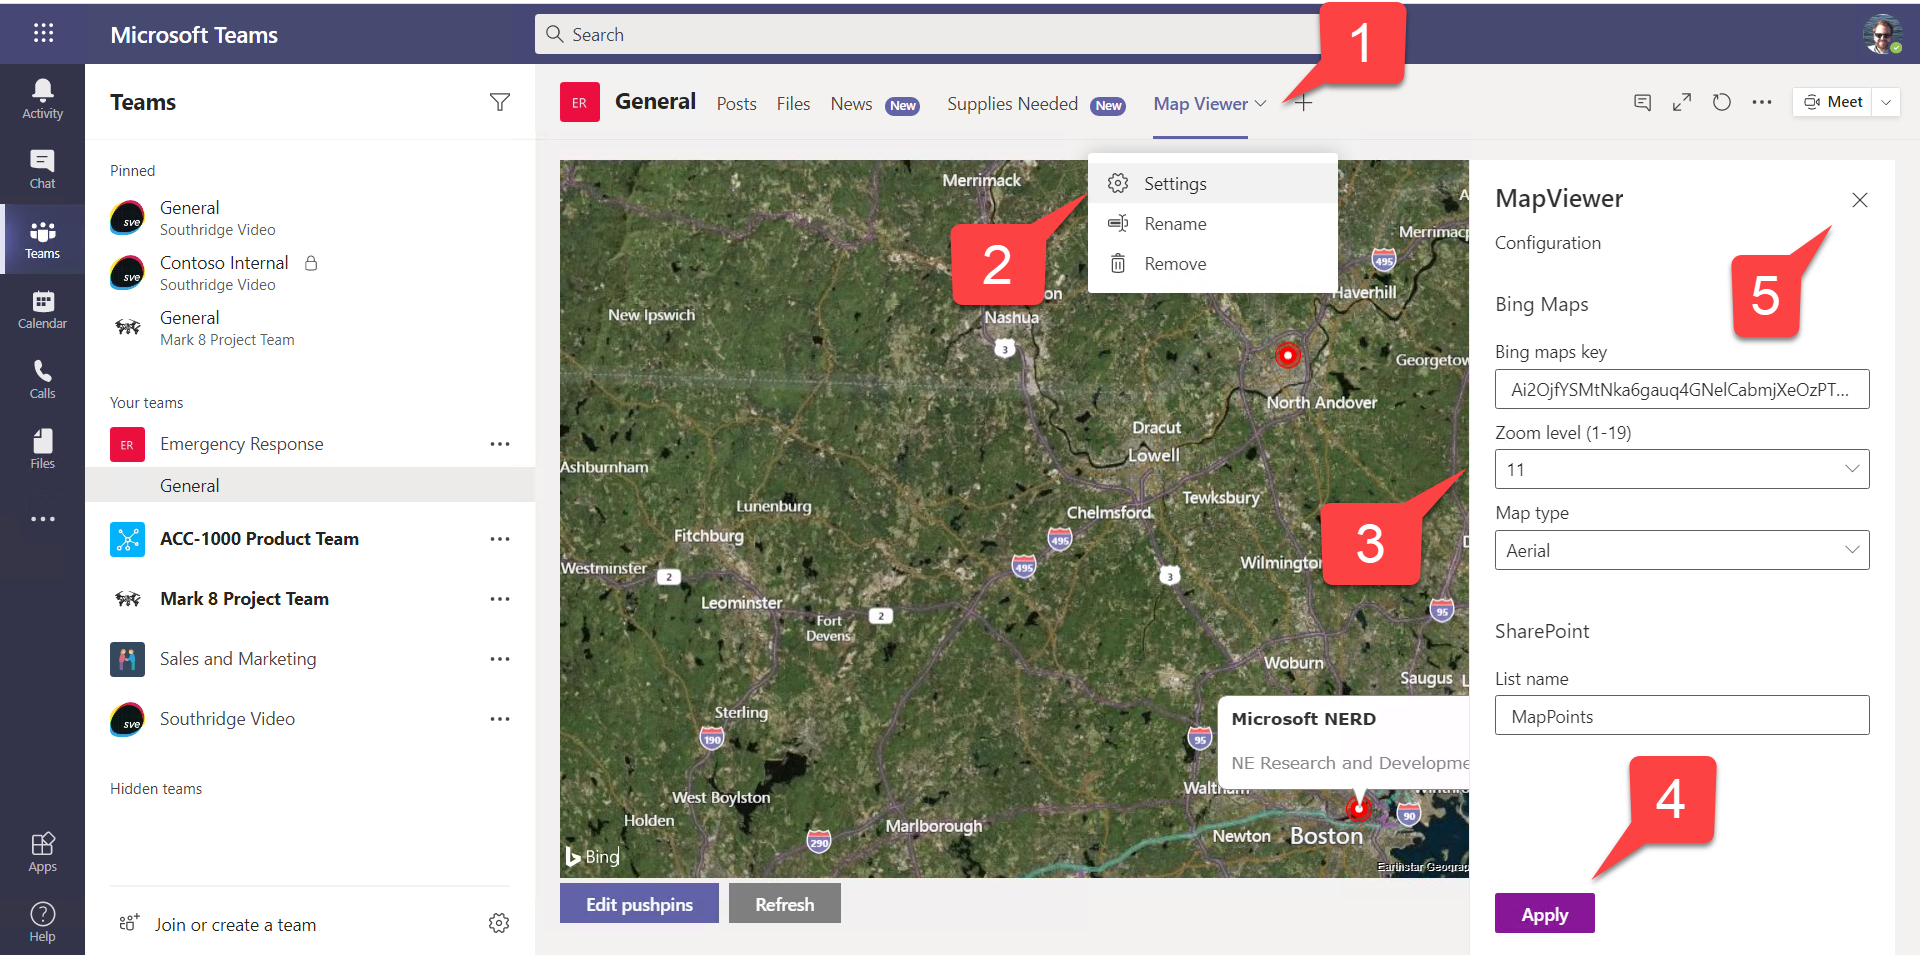
Enter the Bing Maps key into the property panel 1️⃣ and decide if you want an Aerial or Road map 2️⃣. The web part will create a list to store the points on the map; you can choose a different list name if you wish 3️⃣. When you’re done select Apply 4️⃣.
Don’t forget to close the configuration panel.
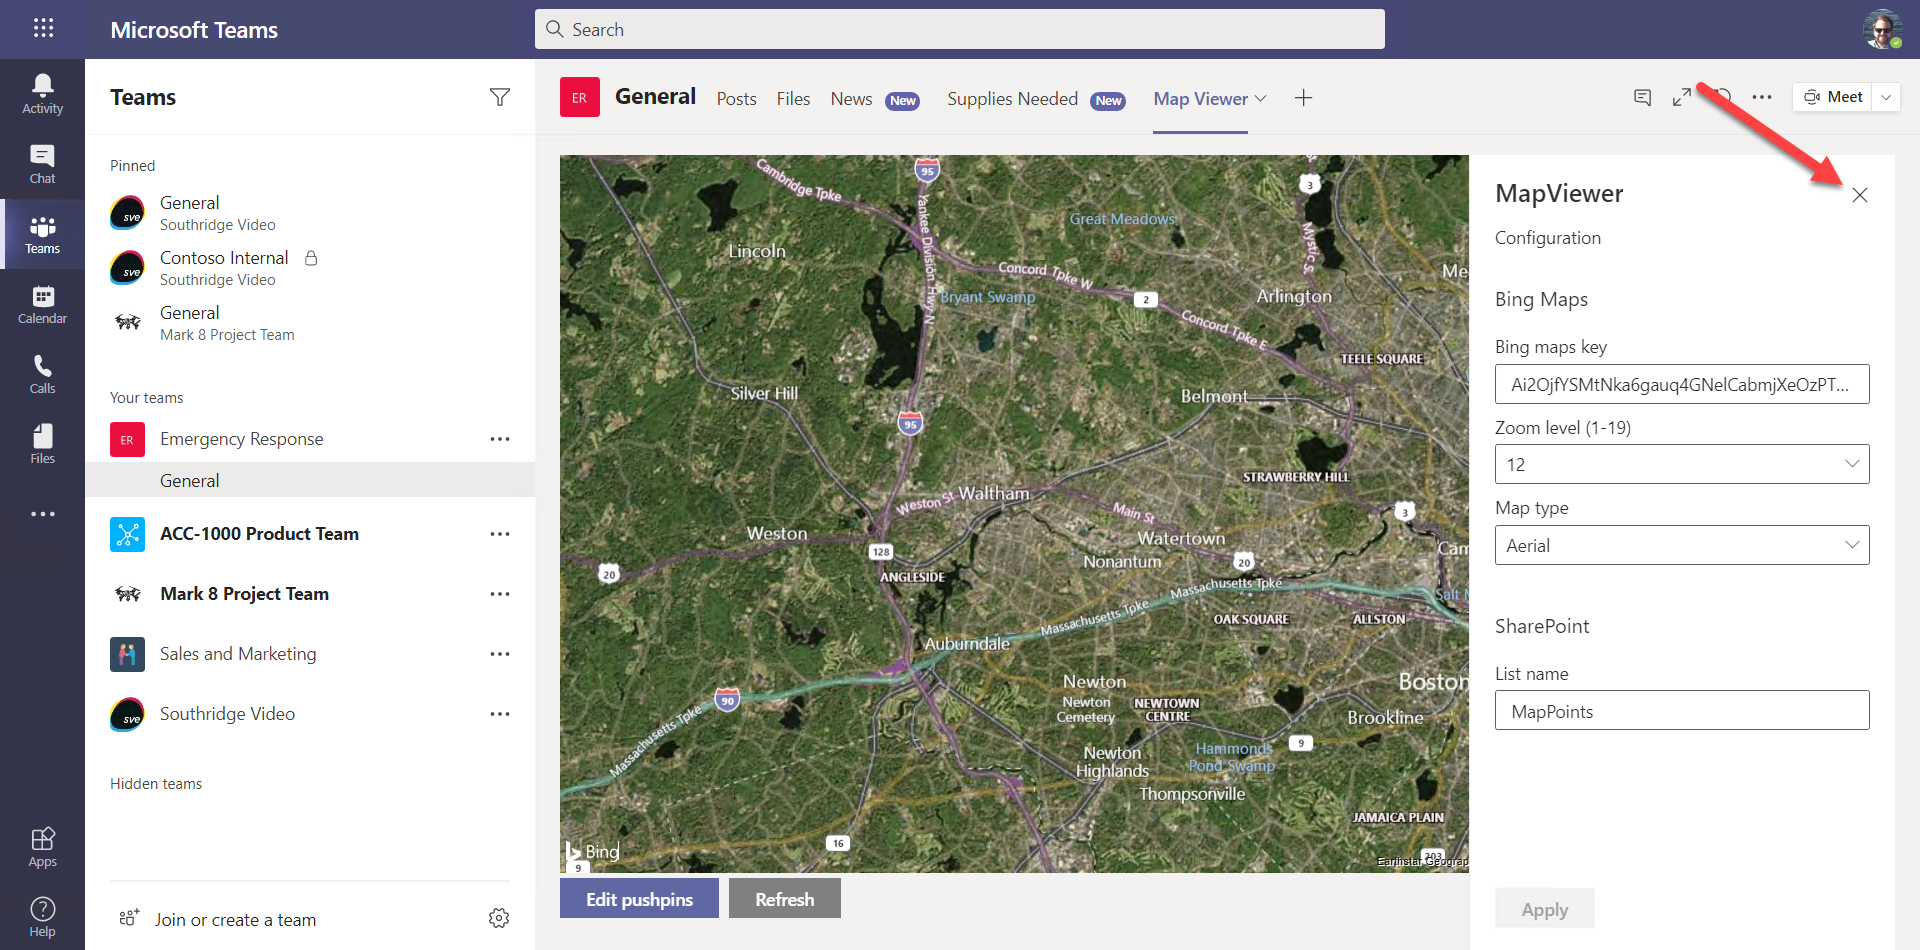
⛏️ THE CONFIGURATION PANEL on the right is the normal web part property pane used by any web part. By using the same method in Teams, it’s easier for developers to build solutions that work in both SharePoint sites and Teams tabs.
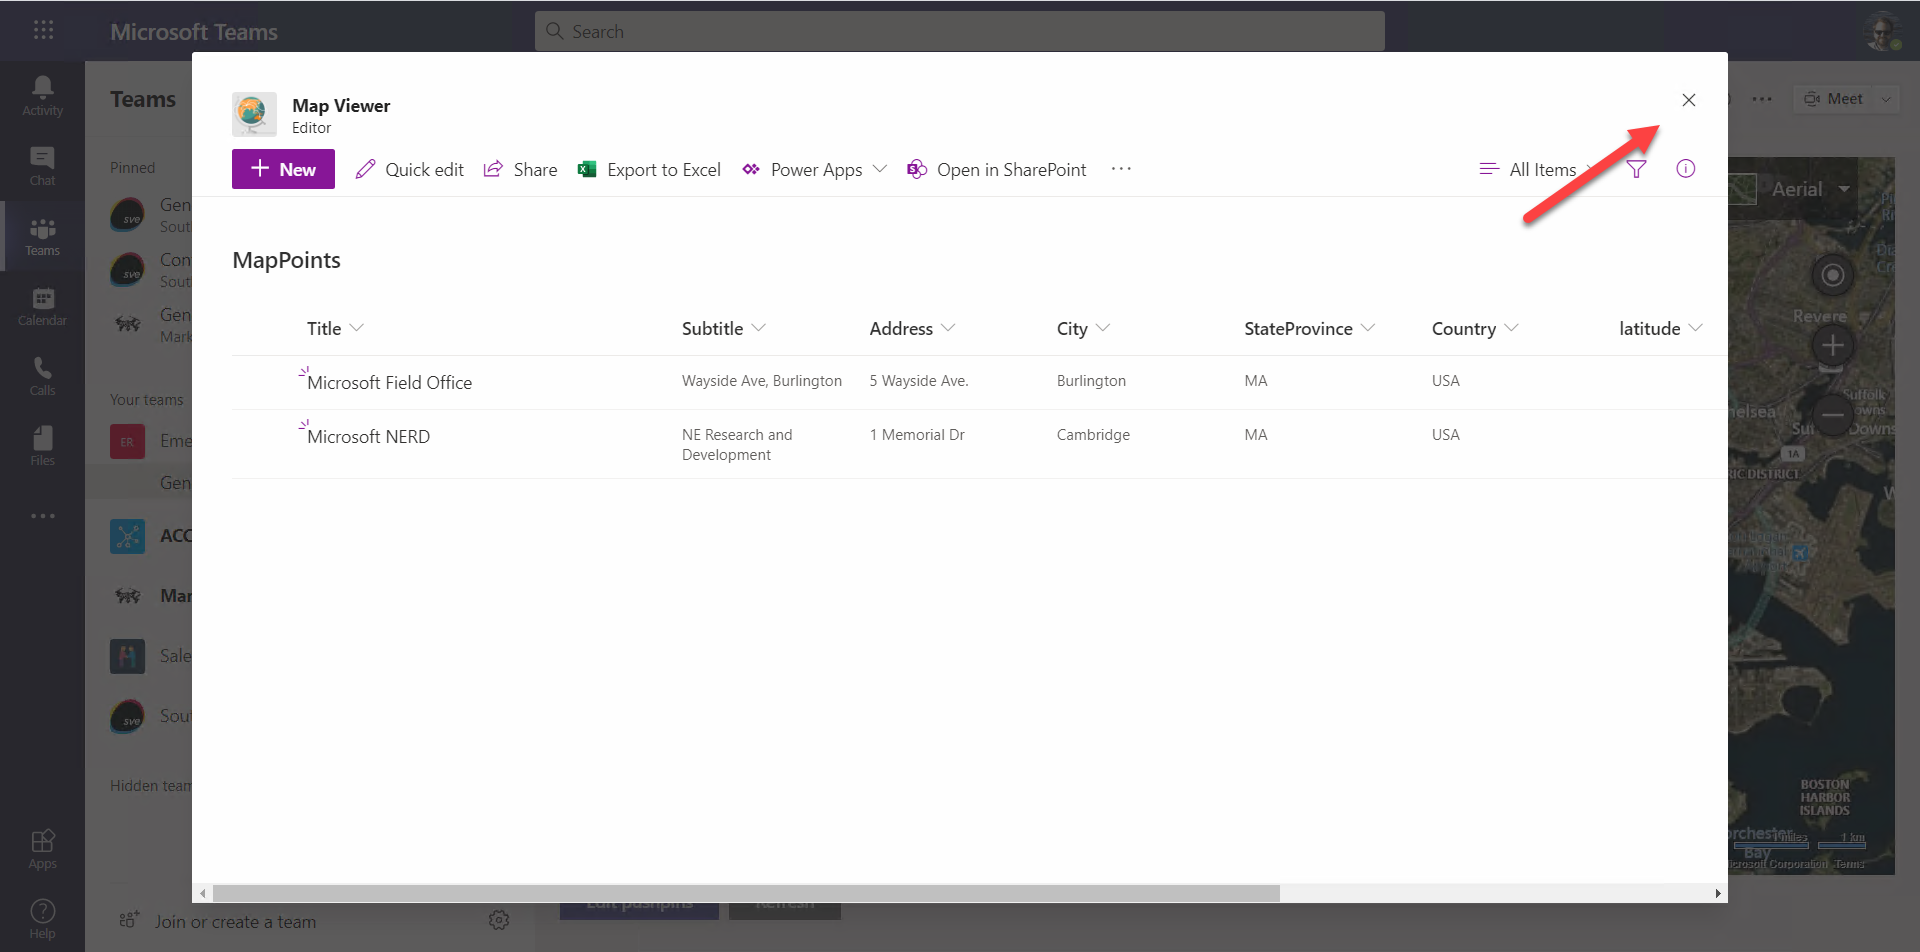
e. Use the Edit pushpins button to add some points to the map. This will open the SharePoint list in a Teams Task Module, which is just an IFrame disguised as a modal dialog box. Using the list user interface saves writing code to manage the points on the map.
Create each new point by using the New button 1️⃣. Enter a Title and Subtitle to be displayed, as well as the Street address of the location you want to highlight 2️⃣. Often you can enter the name of an attraction in place of an address. Be sure you select the Save button after entering each item.
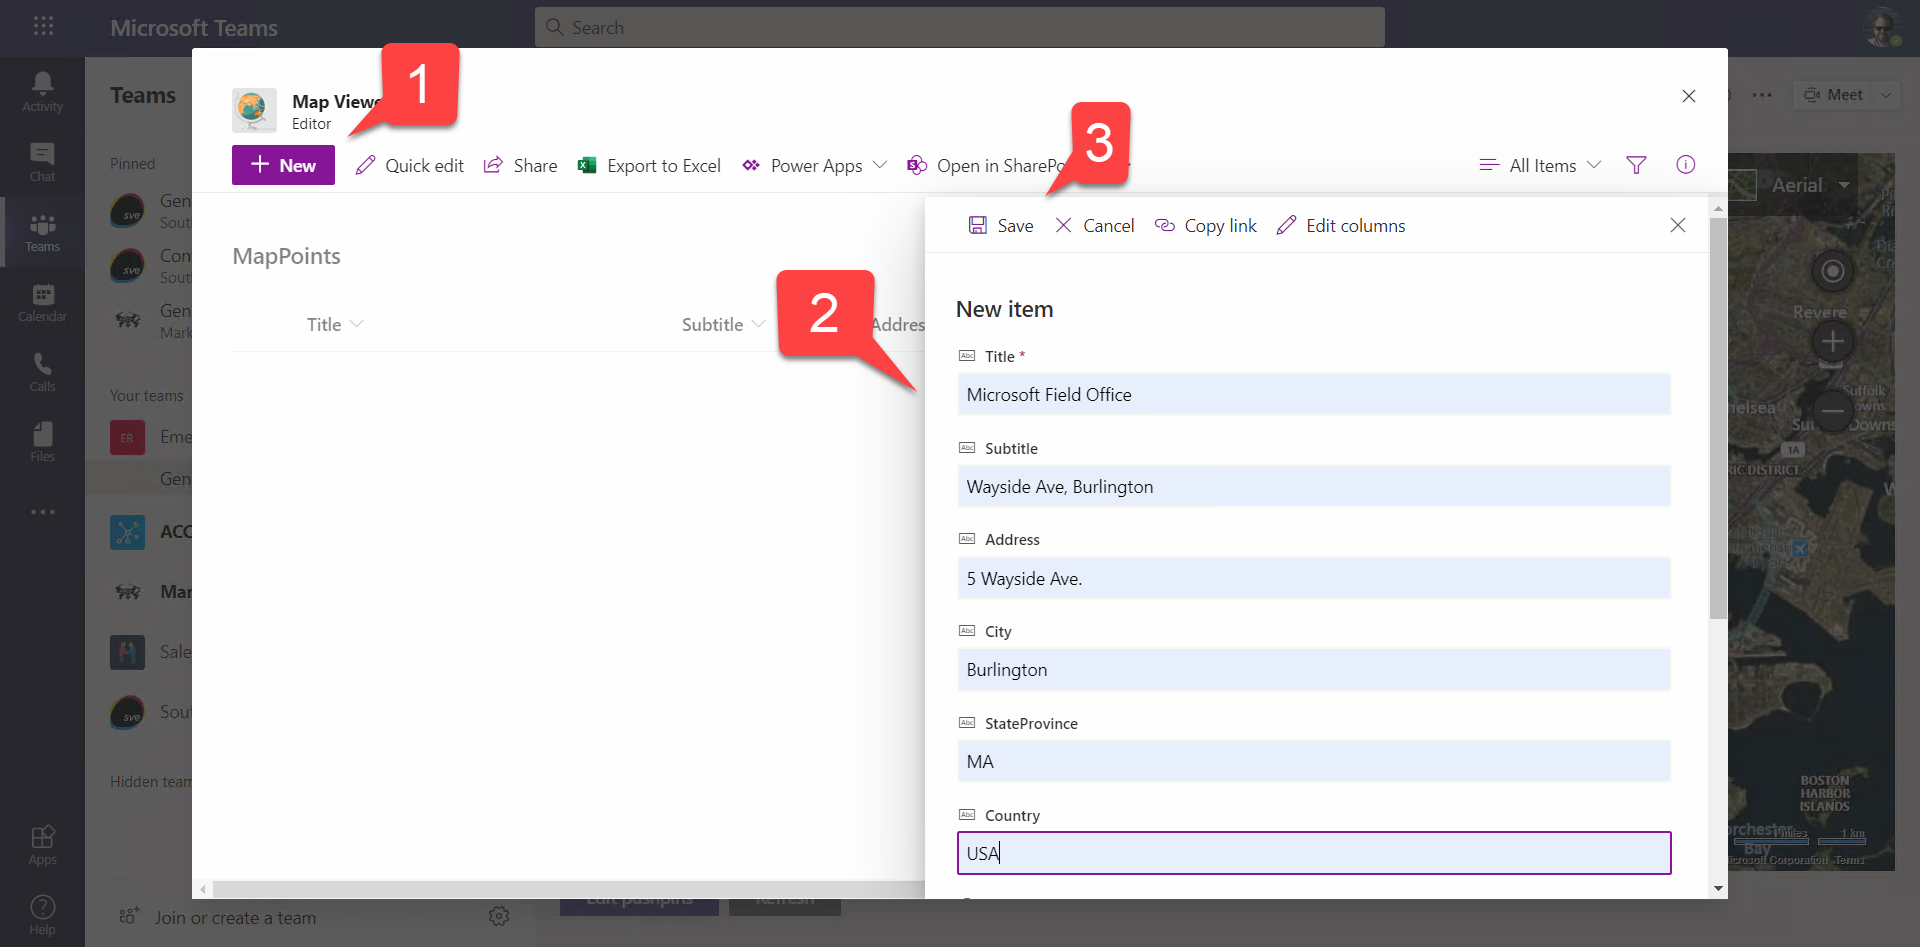
NOTE: You do not need to enter the Latitude and Longitude coordinates; The app should automatically resolve these values for you.
Enter a few points that aren’t too far apart and close the task module.
⛏️ The trick here is to avoid writing all the code to create, read, update, and delete map points but instead just show the SharePoint list in a task module. Task modules are IFrames showing a web page in the form of a modal dialog box. You can view the code in MessagePanel.tsx in the
LaunchEditor()function. Notice that when the task module is closed the display is refreshed to update the points on the map.
⛏️ Geocoding is done in BingMapsService.ts. Since this will call the Bing Maps web service, it was necessary to add an entry for the hostname to the validDomains array in the Teams manifest; otherwise Teams will block the access. Wildcards are permitted, so the entry is *.virtualearth.net to allow any host name within that DNS domain.
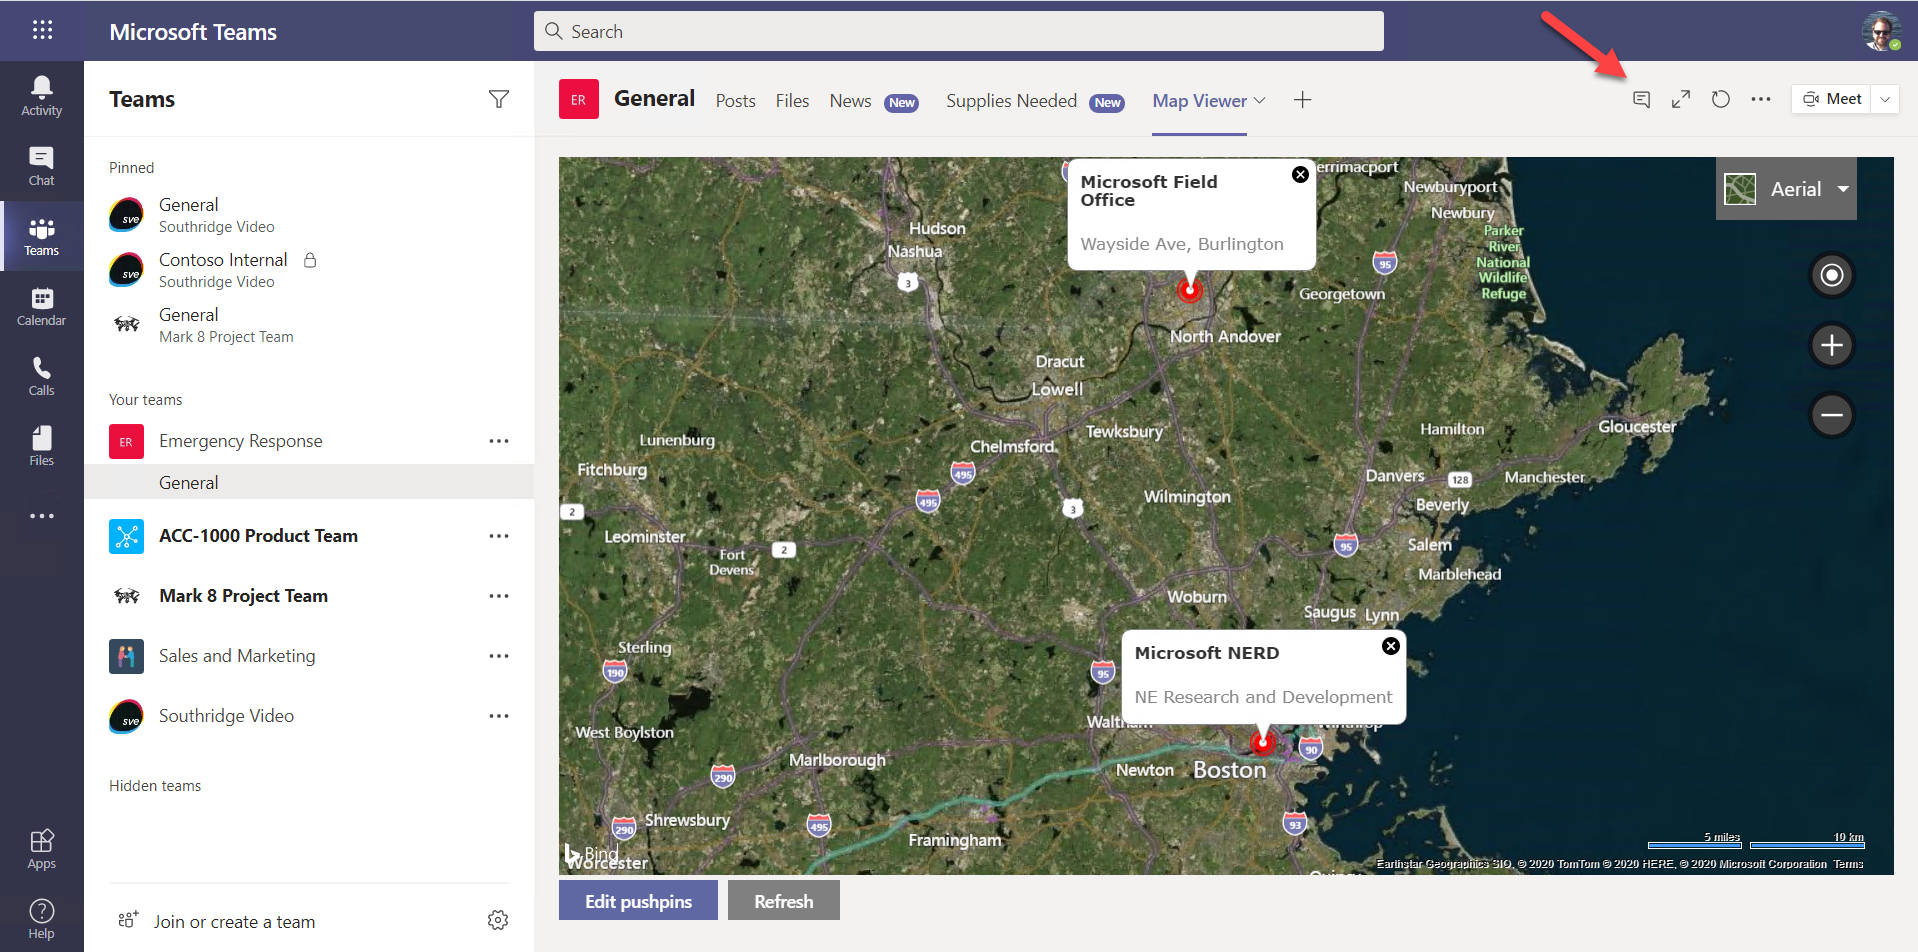
A message below the map should show Updating as the tab geo-codes the map points and writes them back to the list. When this is done, the points should appear on the map.
If they don’t appear, use the Edit points button again and make sure they were all geo-coded (latitude and longitude should be filled in). If not, you may need to change the way you enter the address.
Another thing that could cause the points to not show up is if the map is zoomed in too far. The map will always center itself at the middle of a rectangle defined by the two most distant points; if they’re too far apart, they may be off the map. To fix this, use the drop-down on the Map View tab 1️⃣ and then Settings 2️⃣ to re-open the configuration panel. Change the zoom level 3️⃣ and select Apply 4️⃣. Repeat until you find a zoom level that works well; then close the editing panel 5️⃣.
Step 5: Try out the tab buttons
Notice the buttons just above your tab (and every tab) on the right.
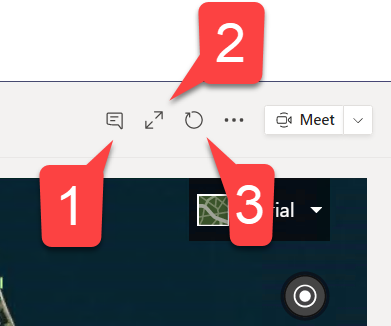
1️⃣ opens a conversation panel so you can chat about the tab. The chat shows up in the channel’s Posts as well, drawing people into the conversation.
2️⃣ expands the tab so it gets more space on the screen.
3️⃣ refreshes just the tab; this is very handy when you’re debugging!
Step 6: Debug your tab
If you’ve set up the SharePoint Framework development environment and are serving the project files up from localhost, you also have the advantage of a map file for debugging. This file unscrambles the JavaScript bundle and reconstructs the original Typescript source for your debugging pleasure.
You might choose to attach Visual Studio code to your browser to debug, but you can also just open up the browser’s developer tools.
a. Open your browser’s developer tools; for Chrome and the new Chromium-based Microsoft Edge, you can do that by pressing CTRL (or option) + SHIFT + I. Examine the page hierarchy; notice the embedded-page-container 1️⃣ ; that’s the IFrame your tab is running in. Inside the IFrame, you can see localhost:4321 2️⃣, which is where SharePoint is getting the JavaScript bundle for your solution. But if you look there, you’ll find the raw JavaScript bundle, which is hard to read. What we want is under the webpack:// node 3️⃣, which is where the map file has been used to reconstruct the original TypeScript source. However, there’s no need to go digging; just click CTRL (or option) + P and type the name of a source file such as MapViewerWebPart.ts to expose the source code.
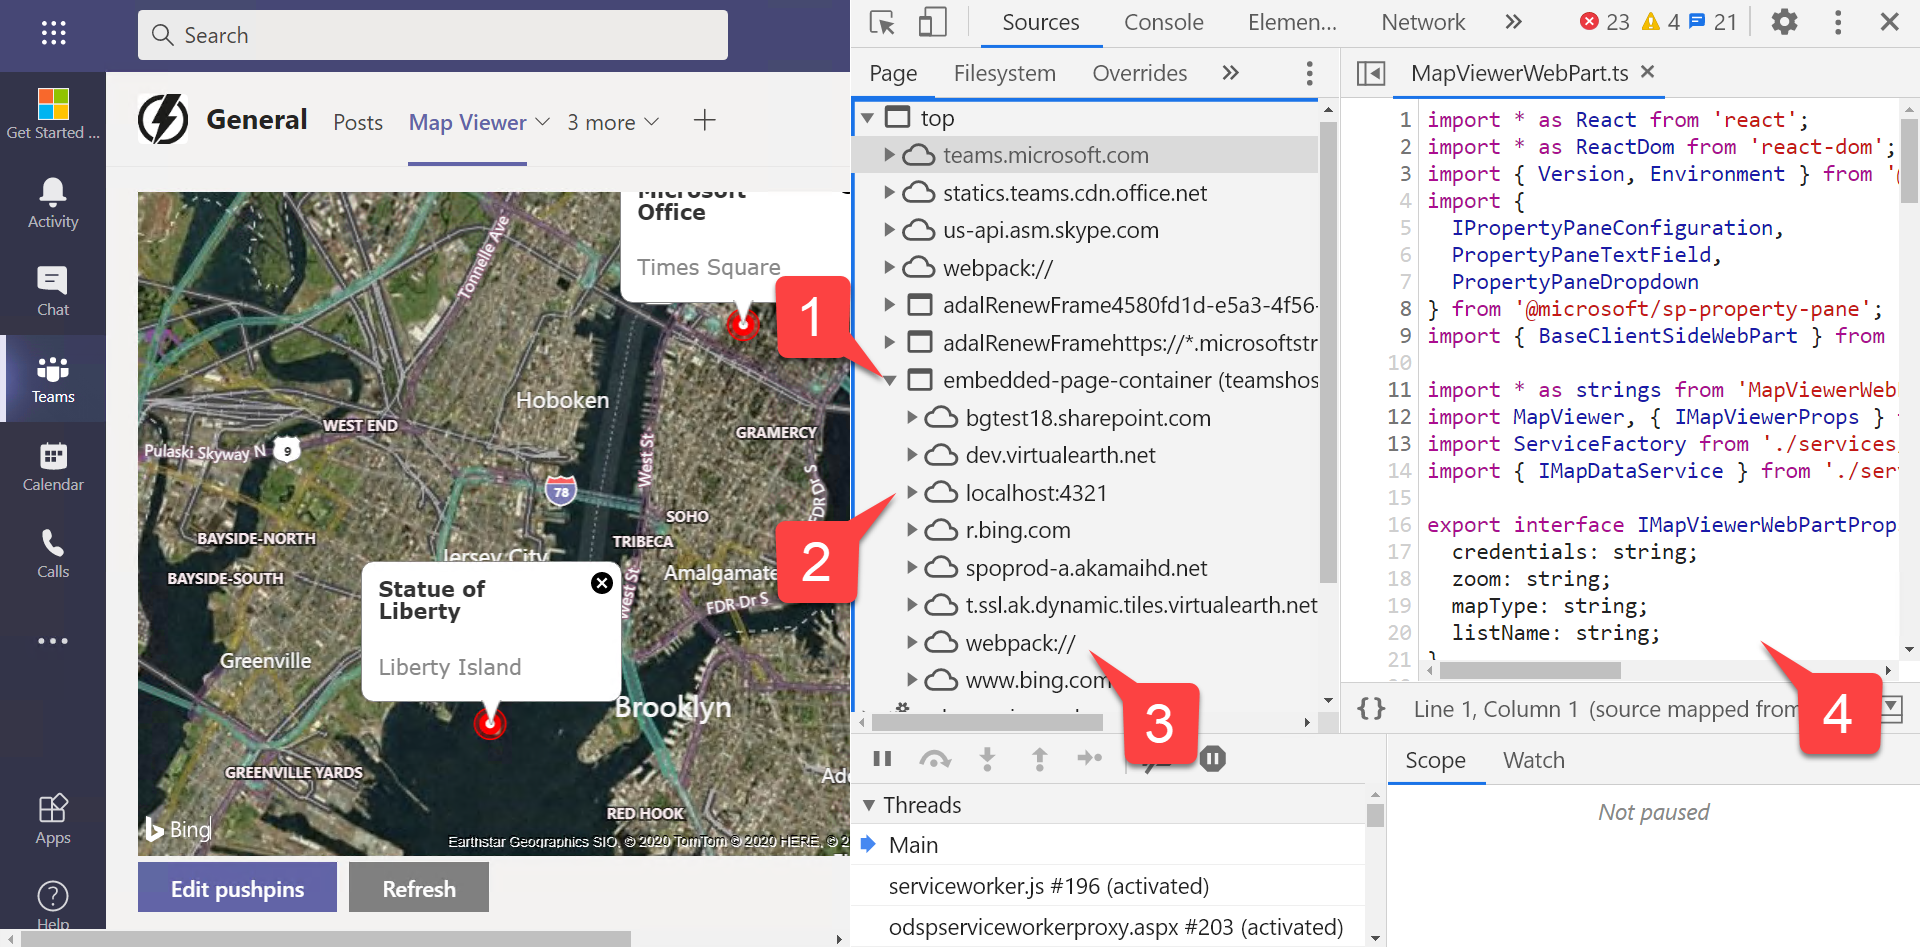
⛏️ Your tab is hosted in a special SharePoint page, /_layouts/15/teamshostedapp.aspx, in the site associated with this Team. Personal tabs implemented as web parts are shown in the root SharePoint site under that URL, which is one reason to make the root site readable by everyone in an organization.
b. Try setting a breakpoint in, say, the onInit() function. Refresh the just the tab using the refresh button you tried in the last step, and hit the breakpoint.
When you’re ready, please proceed to the next section.