Lab B01: Start with a non-Azure Active Directory Identity System
In this series of labs, you will port a simple “Northwind Orders” web application to become a full-fledged Microsoft Teams application. To make the app understandable by a wide audience, it is written in vanilla JavaScript with no UI framework, however it does use modern browser capabilities such as web components, CSS variables, and ECMAScript modules. The server side is also in JavaScript, using Express, the most popular web server platform for NodeJS.
There are two options for doing the labs:
-
The “A” path is for developers with apps that are already based on Azure Active Directory. The starting app uses Azure Active Directory and the Microsoft Authentication Library (MSAL).
-
the “B” path is for developers with apps that use some other identity system. It includes a simple (and not secure!) cookie-based auth system based on the Employees table in the Northwind database. You will use an identity mapping scheme to allow your existing users to log in directly or via Azure AD Single Sign-On.
This is the very first lab in Path B, which begins with an application that has its own, bespoke identity system. You will learn a pattern for adding Azure AD authentication for users while maintaining the bespoke identity system’s user profiles and authorization. This won’t work everywhere but a number of partners have been successful with this kind of approach.
In this lab you will set up the Northwind Orders application, which can be found in the B01-begin-app folder. The labs that follow will lead you step by step into extending the web application to be a Microsoft Teams application with Azure AD Single Sign-On.
- B01-begin-app: Setting up the application with Azure AD (📍You are here)
- B02-after-teams-login: Creating a Teams application
- B03-after-teams-sso: Adding Azure AD SSO to your app
- B04-after-apply-styling: Teams styling and themes
In this lab you will learn to:
- Run a web application using NodeJS
- Expose a local web application using ngrok
Features
- View orders associated with the logged-in user (sales representative)
- View products by category
- View product details and orders for a product
- View order details
The application is based on the Northwind Traders Database, which is a sample relational database that originally shipped with Microsoft Access. The Northwind Traders Database is now available as a demonstration OData service, which is queried in this lab. This is a read-only data source; some of the later exercises appear to update the data but the changes are only stored in the server memory and will only persist until the server is restarted.
Exercise 1: Install prerequisites
You can complete these labs on a Windows, Mac, or Linux machine, but you do need the ability to install the prerequisites. If you are not permitted to install applications on your computer, you’ll need to find another machine (or virtual machine) to use throughout the workshop.
Step 1: Install NodeJS
NodeJS is a program that allows you to run JavaScript on your computer; it uses the open source “V8” engine, which is used in popular web browsers such as Microsoft Edge and Google Chrome. You will need NodeJS to run the web server code used throughout this workshop.
Browse to https://nodejs.org/en/download/ and install the “LTS” (Long Term Support) version for your operating system. This lab has been ested using NodeJS version 14.17.4 and 16.14.0. If you already have another version of NodeJS installed, you may want to set up the Node Version Manager (or this variation for Microsoft Windows), which allows you to easily switch Node versions on the same computer.
Step 2: Install a Code Editor
You can really use any code editor you wish, but we recommend Visual Studio Code.
Step 3: Install ngrok
ngrok is a tunneling program that allows you to access your local web server (running in NodeJS in this case) from the Internet. To complete this exercise, download and install ngrok from here.
The free version of ngrok will assign a URL similar to https://something.ngrok.io, where “something” is a random identifier. As long as ngrok is running (leave it going in a command or terminal window), you can browse your web site at that URL. If you start and stop ngrok, or try to keep it running for more than 8 hours, you’ll get a new identifier and you’ll need to update your app registration, environment variables, etc. The paid version of ngrok allows you to reserve the same URL for use over time, removing the need to update it when you return to the lab.
While ngrok isn’t strictly required for developing Microsoft Teams applications, it makes things much easier, especially if Bots are involved. An example of this is the Messaging Extension lab since Messaging Extensions use a Bot to communicate with Microsoft Teams. If you or your company aren’t comfortable with running ngrok (some companies block it on their corporate networks), please check out this video which explains the details and work-arounds.
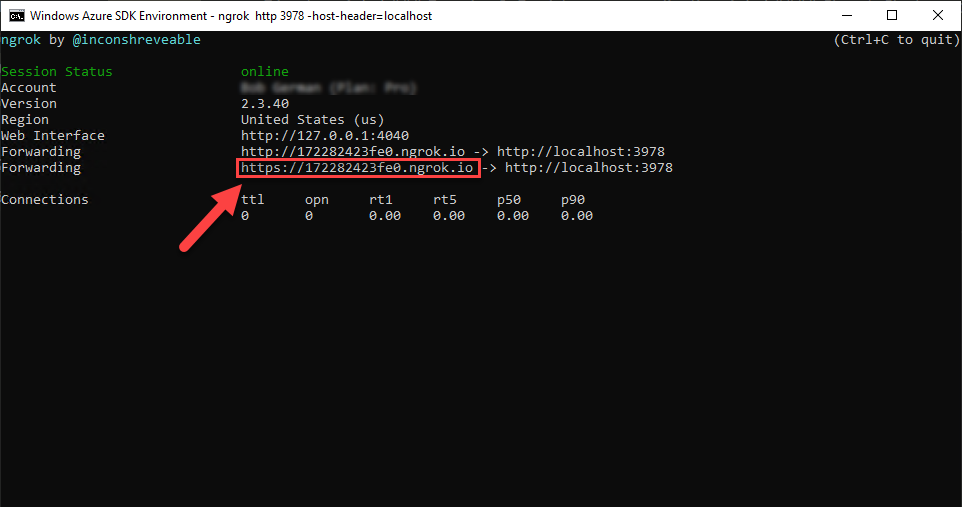
Step 4: Start ngrok
In the command line tool of your choice, navigate to the folder where you’ve saved ngrok.exe and run this command:
ngrok http 3978 -host-header=localhost
The terminal will display a screen like this; note the https forwarding URL for use in this lab. Save this URL for use throughout the labs.
NOTE: This page lists all the exercies which involve the ngrok URL so you can easily update it if it changes.
Exercise 2: Configure and run the application
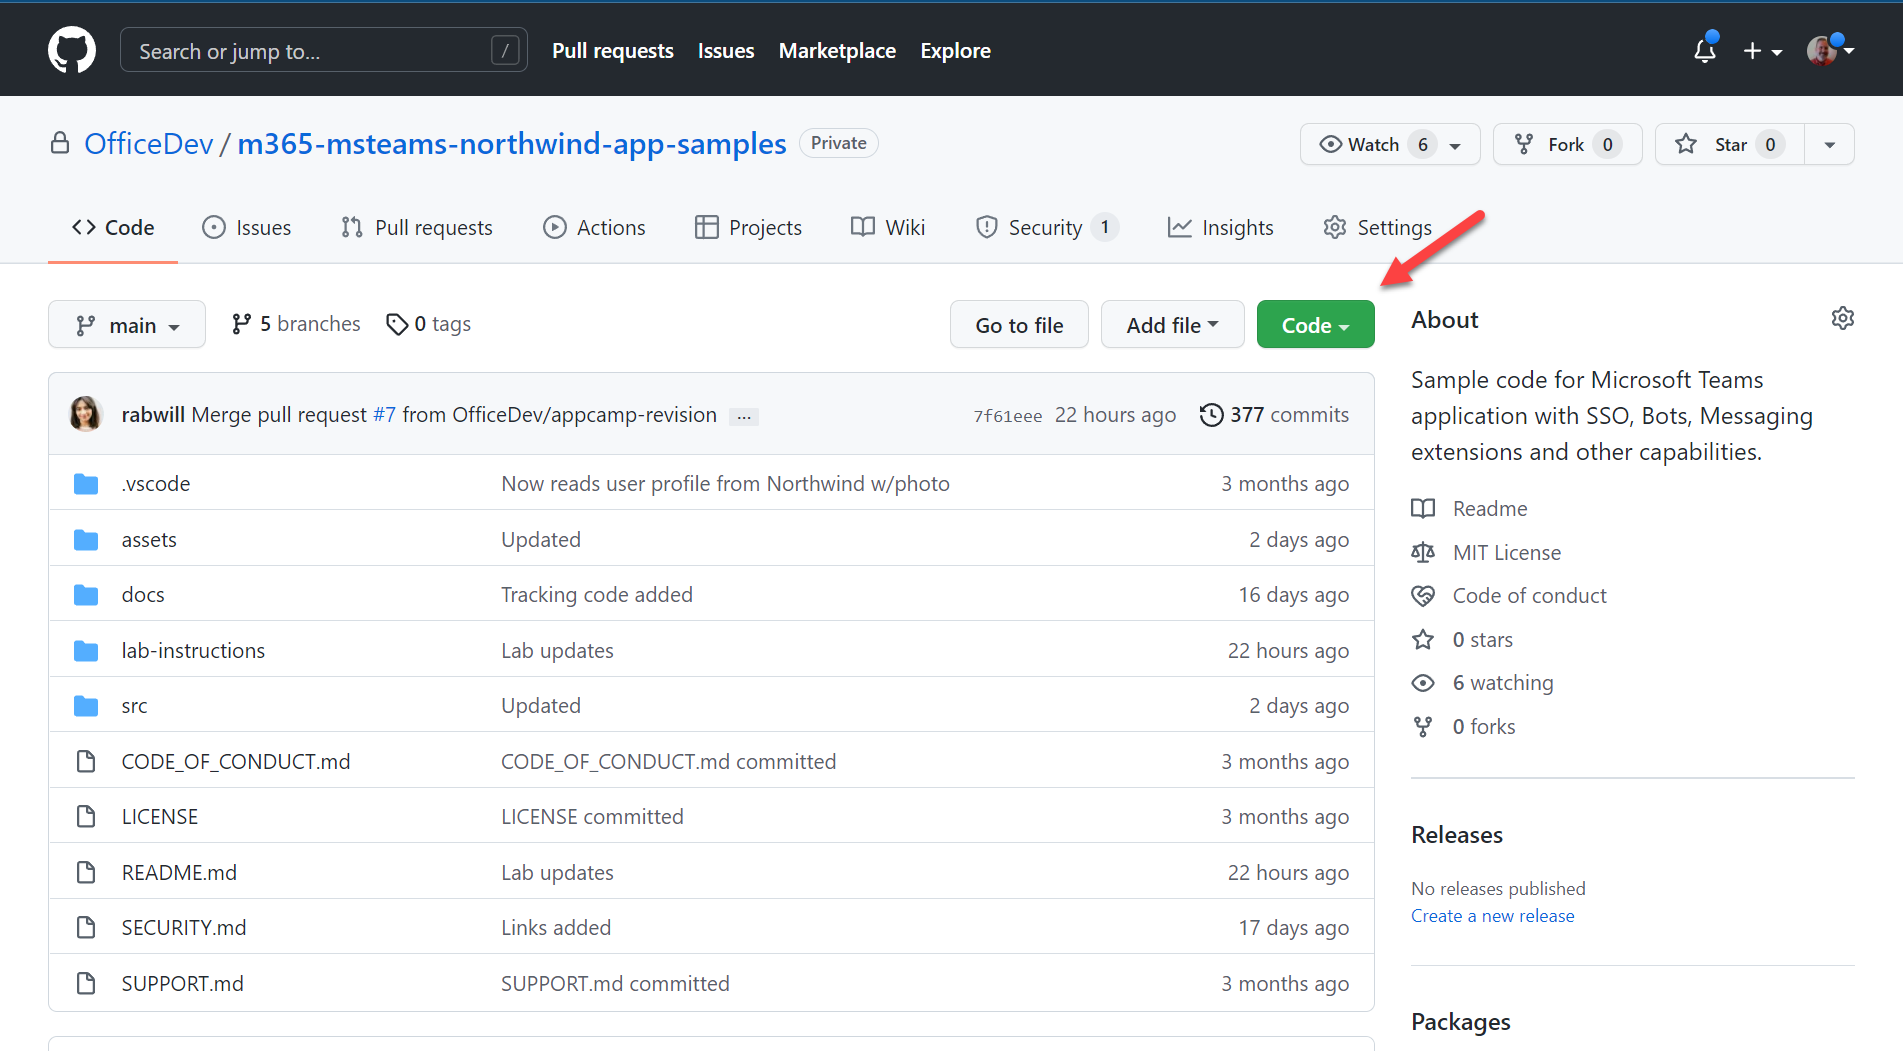
Step 1: Download the starting application
The starting application is in github at https://github.com/OfficeDev/m365-msteams-northwind-app-samples. Click the “Code” button and clone or download the content to your computer.
The starting code for the “B” path is in the B01-Start-BespokeAuth folder. Copy this folder to nother location on your computer; this will be your working copy to keep the original source separate. Folders are also provided with the final code for the other labs.
Step 2: Install the app’s dependencies
Using a command line tool of your choice, navigate to your working directory and type the command:
npm install
This will install the libraries required to run the server side of your solution.
Step 3: Download the sample data
The Northwind Orders application uses the venerable Northwind database for sample data. The Northwind Database originally shipped with Microsoft Access, then SQL Server, and now is available as a test OData service from the OData organization. In this step, you’ll download the entire Northwind database from this test service to local JSON files, which are used by the Northwind Orders application.
Using a command line tool in your working directory, type:
npm run db-download
This will create a JSON file in the northwindDB folder for each table in the Northwind database. The appliction reads and writes these JSON files. It’s generous to call these files a “database”, but it works well for a single-user lab environment.
Step 4: Configure the app settings
In a code editor, open the working folder you created in Step 2. Copy the .env_sample file to a new file called .env and open the new file. It will look like this:
COMPANY_NAME=Northwind Traders
PORT=3978
No changes are required to this file until future labs in the series, but you do need to create the .env file for the app to run.
Step 5: Run the application
To run the application, open a command line in your working folder and type:
npm start
At this point you should be able to browse to your ngrok URL (saved in Exercise 1 Step 4) and use the application. Note that due to the ngrok tunnel, you can try your app from anywhere on the Internet.
At first you will be directed to the Northwind login page.
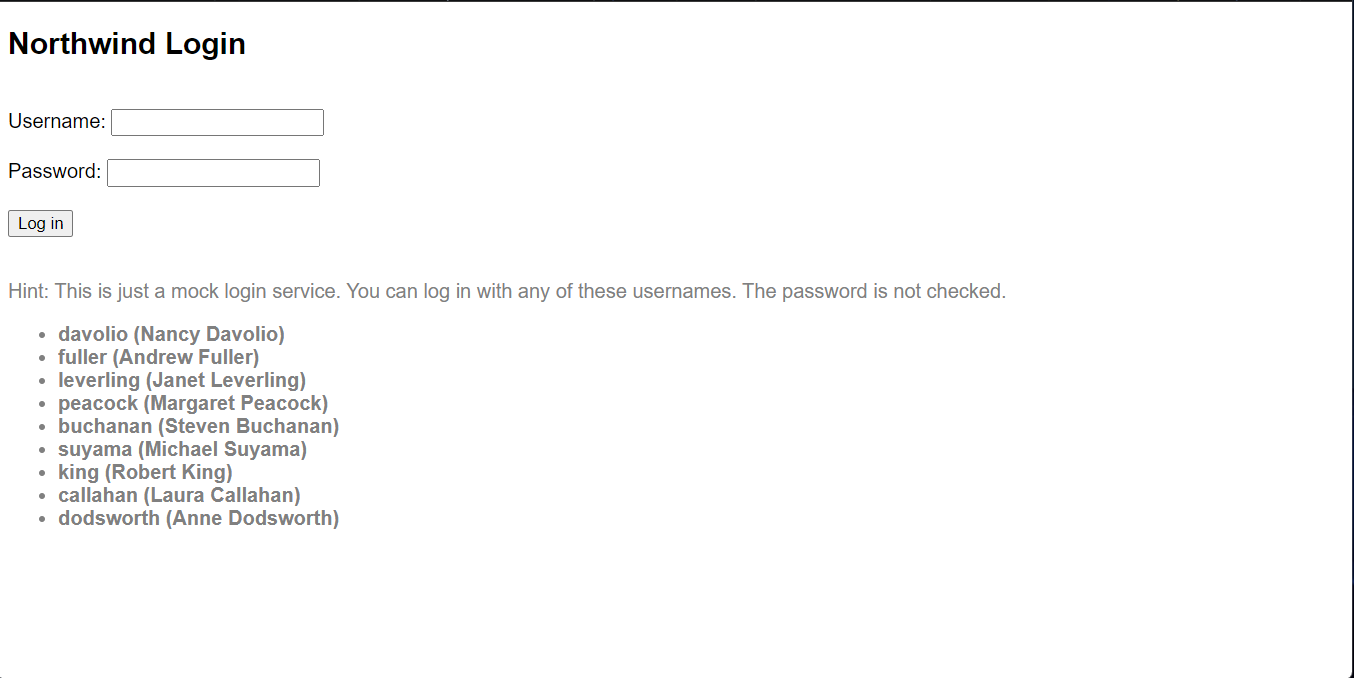
The login system is ridiculously simple; usernames just the last names of each employee, which are stored in the Northwind employee database. Any employee last name with any password will work! As if that wasn’t insecure enough, the employees are listed right on the page! (This is intended for instructional purposes, not to be secure. Do not use this code in a real application!)
Log in using one of the last names shown with a blank password; the system will ensure the employee exists and place the employee ID in a browser session cookie. Each web service request is validated by checking that the cookie contains a number. Of course a real authentication scheme would require a password or other proof of identity, and would issue a secure token in the cookie or elsewhere.
When you’ve logged in, you will see the Northwind Orders application. The home page contains two pieces of information from the user profile, the user’s full name and a small profile card showing the user’s name, job title, and a logoff button.
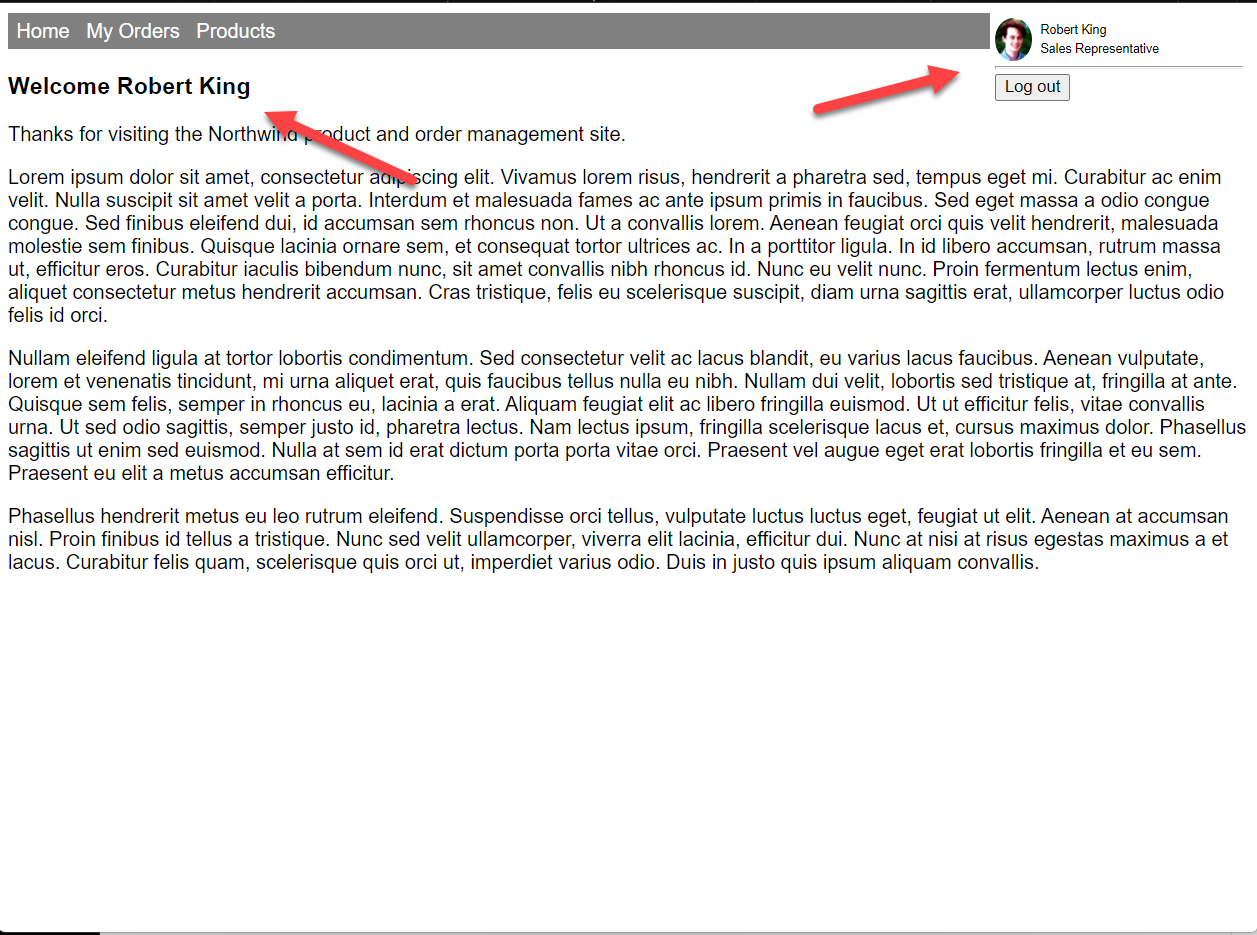
Click “My Orders” in the top navigation bar to view the employee’s orders.

You can click on any order to view the details.
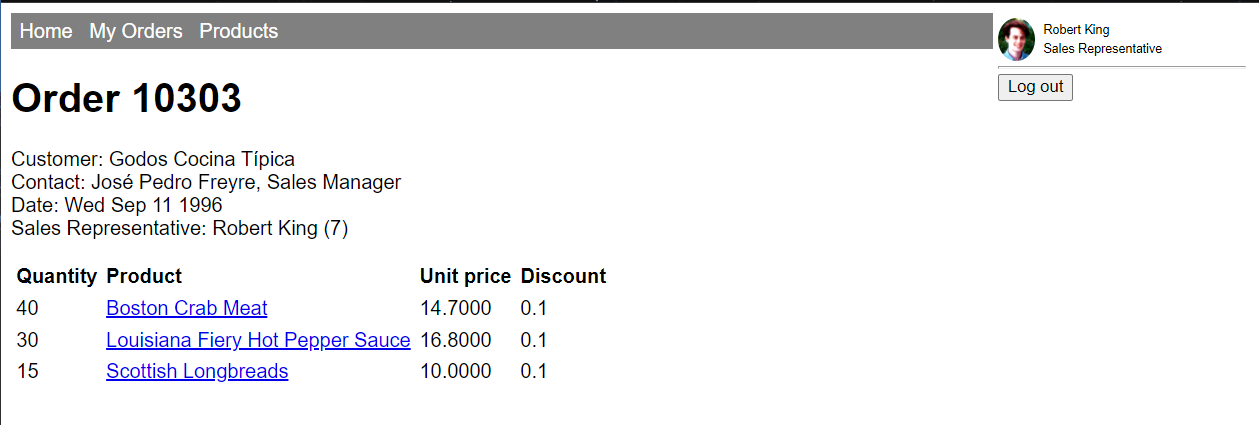
From here you can click on any product to view its details. Much of the data is hyperlinked in this fashion.
You can also click on “Products” in the top navigation to view a list of product categories.
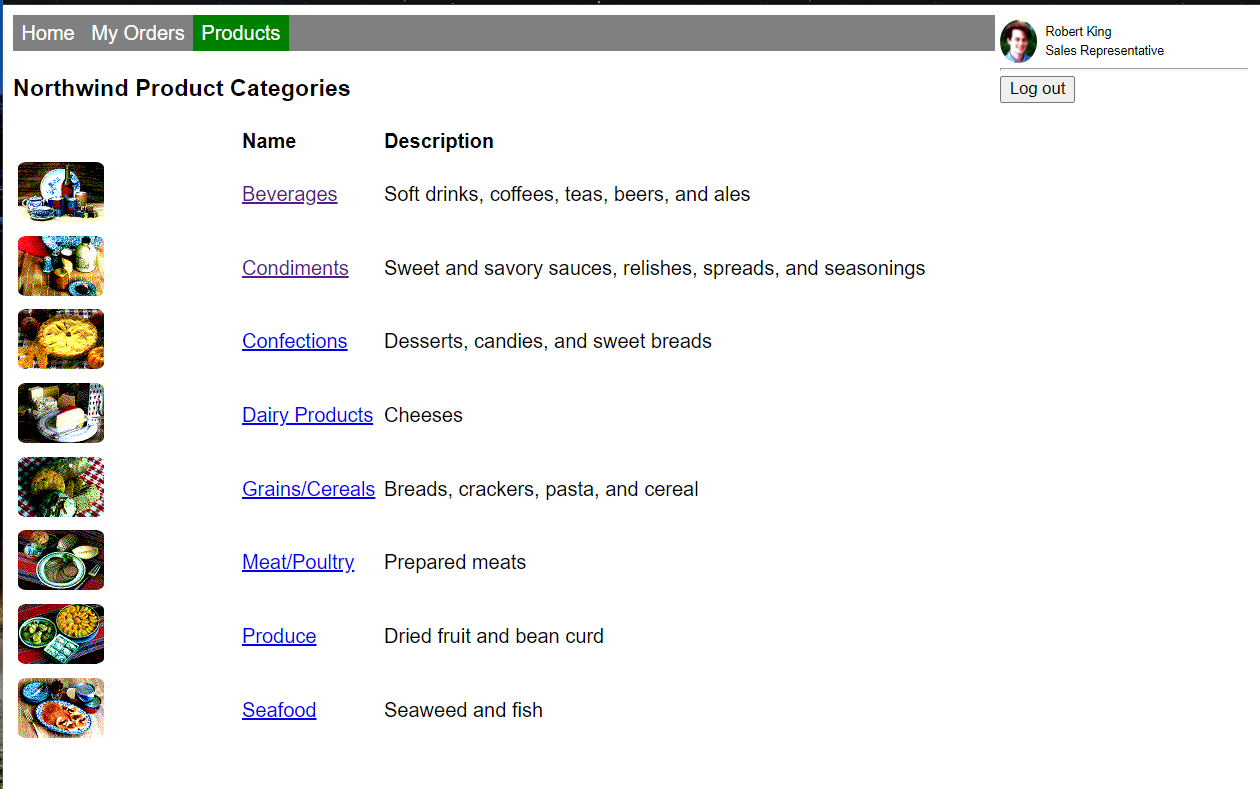
From there you can click into a product category to view a list of products, and then you can click into a product to see its details. The product detail page shows all the orders for the product, which leads to a list of orders, and so you can click your way around the sample data.
Try logging out and logging in; you should be able to view the orders for another user based on the employee ID field in the Orders table.
😎 LOGIN STATE IS STORED IN A BROWSER COOKIE: The sample login scheme uses a browser session cookie to establish who is logged in. It is not secure - do not use this in a real application! Also be aware during testing that your login will persist until you close all instances of your web browser. For example if you leave your browser logged in after this lab and then run Microsoft Teams in another instance of the same browser, your user will already be logged in when you get to the next lab.
Known issues
The application does not implement paging for large data sets, so lists of orders etc. are limited to the first 10 results.
While it will work on mobile devices, the application is not responsive and will not look good on these devices. This will be addressed in a future version of the lab.