Add a Task Module
This lab is part of extending app capabilities for your teams app which begins with a Northwind Orders core application using the AAD path. The core app is the boilerplate application with which you will do this lab.
Complete labs A01-A03 for deeper understanding of how the core application works, to set up AAD application registration etc. to update the
.envfile as per the.env_sample. This configuration is required for the success of the lab.
The completed lab is here
Task modules are modal pop-up experiences in Teams application using html or JavaScript code, iframes or adaptive cards. This can greatly simplify the user experience when a data input is required. For simplicity let’s call them a dialog for this lab. There are many ways you can incorporate a task module. In this lab we focus on using the app’s own HTML form.
In this exercise you will learn new concepts as below:
Features
- In the application’s order details page, add a button to open a web based form to add notes for a particular order.
Exercise 1: Code changes
Step 1: Add new files
There are new files and folders that you need to add into the project.
1.\client\pages\orderNotesForm.html
Create a new file orderNotesForm.html in the path \client\pagesand copy below form HTML into it.
<!DOCTYPE html>
<html lang="en">

<head>
    <meta charset="UTF-8" />
    <title>Task Module: Update order notes</title>
    <link rel="stylesheet" href="/northwind.css" />
    <link rel="icon" href="data:;base64,="> <!-- Suppress favicon error -->
    <script src="https://statics.teams.cdn.office.net/sdk/v1.11.0/js/MicrosoftTeams.min.js"
        asp-append-version="true"></script>
</head>
    <body>
        <script>
            microsoftTeams.initialize();
            function validateForm() {
                var orderFormInfo = {
                    notes: document.forms["orderForm"]["notes"].value,
                }
                microsoftTeams.tasks.submitTask(orderFormInfo);
                return true;
            }
        </script>
        <form id="orderForm" onSubmit="validateForm()">
            <div>
               <textarea id="notes" name="notes" rows="4" cols="50"></textarea>
            </div>
            <div>
                <button type="submit" tabindex="2">Save</button>
            </div>
        </form>
    </body>

</html>
This is a web form which captures an input notes which is a multi line text area.
The form uses Microsoft Teams SDK’s microsoftTeams.tasks.submitTask to pass the form values back into a callback function.
Step 2: Update existing files
1.\client\pages\orderDetail.html
Add a content area to display all comments/notes for the order. Add a new button to open the web based form as a dialog.
Copy below block of code and paste it above the <table> element of the page.
<div id="orderContent">
</div>
<br/>
<button id="btnTaskModule">Add notes</button>
2.\client\pages\orderDetail.js
In the displayUI() function, define two constants to get the two HTML elements we just added.
 const btnTaskModuleElement = document.getElementById('btnTaskModule');
 const orderElement=document.getElementById('orderContent');
To open the dialog, add an event listener for the button btnTaskModule.
Paste below code in the dislayUI() function in the end, before closing the try block.
 btnTaskModuleElement.addEventListener('click',  ev => {
            let submitHandler = (err, result) => {
                const postDate = new Date().toLocaleString()
                const newComment = document.createElement('p');
                newComment.innerHTML=`<div><b>Posted on:</b>${postDate}</div>
                <div><b>Notes:</b>${result.notes}</div><br/>
                -----------------------------`
                orderElement.append(newComment);
            }
            let taskInfo = {
                title: null,
                height: null,
                width: null,
                url: null,
                card: null,
                fallbackUrl: null,
                completionBotId: null,
            };
            taskInfo.url = `https://${window.location.hostname}/pages/orderNotesForm.html`;
            taskInfo.title = "Task module order notes";
            taskInfo.height = 210;
            taskInfo.width = 400;
           //open the dialog
            microsoftTeams.tasks.startTask(taskInfo, submitHandler);
        });
To open a dialog from a tab, use microsoftTeams.tasks.startTask().
You can pass the taskInfo object and a callback function called submitHandler to pass the results back from the dialog.
The final look of displayUI() function is as below:
import {
    getOrder
} from '../modules/northwindDataService.js';

async function displayUI() {

    const displayElement = document.getElementById('content');
    const detailsElement = document.getElementById('orderDetails');
    const btnTaskModuleElement = document.getElementById('btnTaskModule');
    const orderElement=document.getElementById('orderContent');
    try {

        const searchParams = new URLSearchParams(window.location.search);
        if (searchParams.has('orderId')) {
            const orderId = searchParams.get('orderId');

            const order = await getOrder(orderId);

            displayElement.innerHTML = `
                    <h1>Order ${order.orderId}</h1>
                    <p>Customer: ${order.customerName}<br />
                    Contact: ${order.contactName}, ${order.contactTitle}<br />
                    Date: ${new Date(order.orderDate).toDateString()}<br />
                    ${order.employeeTitle}: ${order.employeeName} (${order.employeeId})
                    </p>
                `;

            order.details.forEach(item => {
                const orderRow = document.createElement('tr');
                orderRow.innerHTML = `<tr>
                        <td>${item.quantity}</td>
                        <td><a href="/pages/productDetail.html?productId=${item.productId}">${item.productName}</a></td>
                        <td>${item.unitPrice}</td>
                        <td>${item.discount}</td>
                    </tr>`;
                detailsElement.append(orderRow);

            });

        }
        btnTaskModuleElement.addEventListener('click',  ev => {
            let submitHandler = (err, result) => {
                const postDate = new Date().toLocaleString()
                const newComment = document.createElement('p');
                newComment.innerHTML=`<div><b>Posted on:</b>${postDate}</div>
                <div><b>Notes:</b>${result.notes}</div><br/>
                -----------------------------`
                orderElement.append(newComment);
            }
            let taskInfo = {
                title: null,
                height: null,
                width: null,
                url: null,
                card: null,
                fallbackUrl: null,
                completionBotId: null,
            };
            taskInfo.url = `https://${window.location.hostname}/pages/orderNotesForm.html`;
            taskInfo.title = "Task module order notes";
            taskInfo.height = 210;
            taskInfo.width = 400;

            microsoftTeams.tasks.startTask(taskInfo, submitHandler);
        });
    }
    catch (error) {            // If here, we had some other error
        message.innerText = `Error: ${JSON.stringify(error)}`;
    }
}
displayUI();
Exercise 2: Test the changes
Step 1 : Run the application in Teams client
Now that you have applied all code changes, let’s test the features. This lab assumes you already completed the Core lab and registered an Azure AD application, built and uploaded your Teams package, etc. So at this point, all you should need to do is run
- Once you are in the application, go to
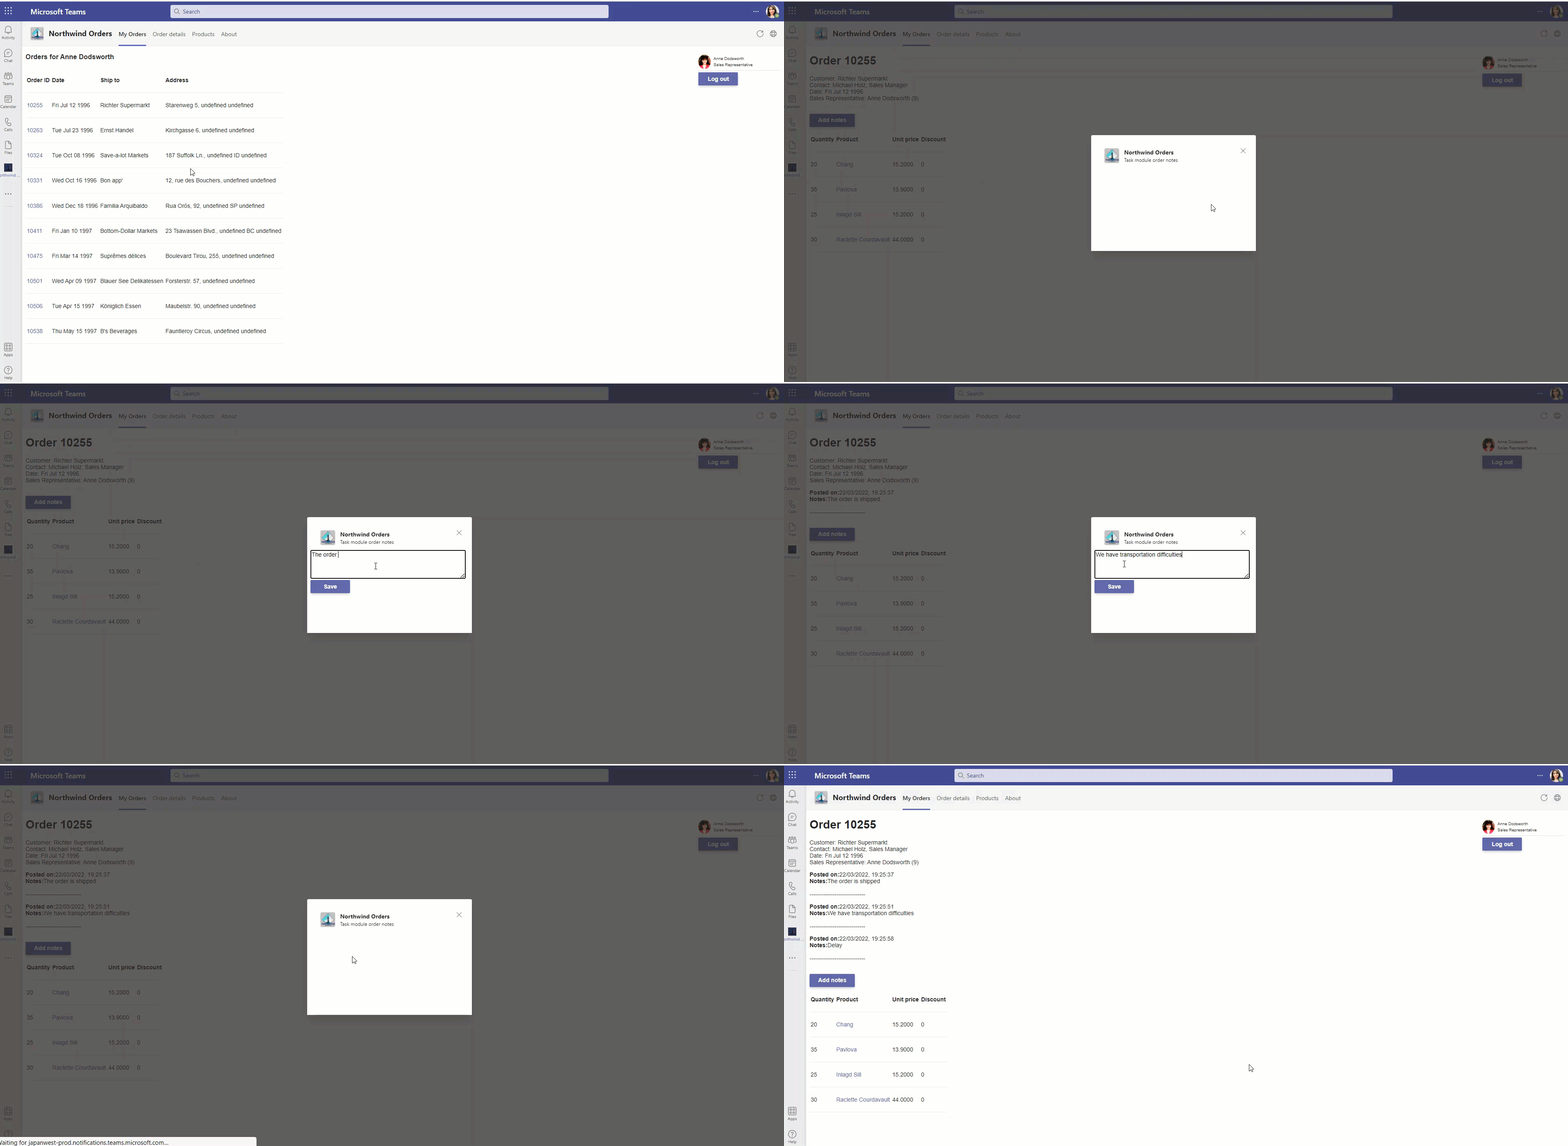
My orderspage and select any order. - Once in the order details page, select the Add notes button to open the dialog.
- Add comment/note and select Save.
- Notice the dialog closed and the results getting added into the order details page.

The comments are not saved back into the northwind database as it is read only for this lab. You can call your CRUD operations suitably in your application.
Next steps
After completing this lab, you may continue with any of the following labs.